Bedienungsanleitung ACHTUNG! Lesen Sie sich vor der ersten Inbetriebnahme zur eigenen Sicherheit diese Bedienungsanleitung sorgfältig durch! Alle Personen, die mit der Aufstellung, Inbetriebnahme, Bedienung, Wartung und Instandhaltung dieses Gerätes zu tun haben, müssen entsprechend qualifiziert sein und diese Betriebsanleitung genau beachten.
BEDIENUNGSANLEITUNG ACHTUNG! Lesen Sie sich vor der ersten Inbetriebnahme zur eigenen Sicherheit diese Bedienungsanleitung sorgfältig durch! Alle Personen, die mit der Aufstellung , Inbetriebnahme, Bedienung, Wartung und Instandhaltung dieses Gerätes zu tun haben, müssen entsprechend qualifiziert sein und diese Betriebsanleitung genau beachten.
DEUTSCH dern des Gerätes nicht gestattet. Beachten Sie bitte, dass Schäden, die durch manuelle Veränderungen an diesem Gerät verursacht werden, nicht unter den Gewährleistungsanspruch fallen. - Im Geräteinneren befinden sich keine zu wartenden Teile, ausgenommen die von außen austauschbaren Verschleißteile.
Verwendung mit Gefahren wie z.B. Kurzschluss, Brand, elektrischem Schlag, etc. verbunden. - Die vom Hersteller festgelegte Seriennummer darf niemals entfernt werden, da ansonsten der Gewährleistungsanspruch erlischt. WARTUNG - Überprüfen Sie regelmäßig die technische Sicherheit des Gerätes auf Beschädigungen des Netzkabels oder des Gehäuses, sowie auf die Abnutzung von Verschleißteilen wie Dreh- und Schiebereglern.
1.1 Bedienelemente DEUTSCH Geräteoberseite T1. FX 1 Routing-Taste (Shift: Master-Deck-Zuweisung) [Traktor Pro] T2. FX 2 Routing-Taste (Shift: Snap-Modus) [Traktor Pro] T3. FX 3 Routing-Taste (Shift: Quantize-Modus) [Traktor Pro] T4. FX 4 Routing-Taste (Shift: LFO Reset) [Traktor Pro] T5. TRAX-Encoder (Shift: Ordnernavigation) T6. Deckzuweisungs-Tasten (Shift: Deck Cue) T7. Dry/Wet-Feinregelung (Shift:Effektwechsel im Advanced Effekt-Modus) T8.
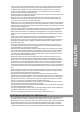
2. Geräteinstallation - Schalten Sie das Gerät zunächst über den Ein/Aus-Schalter -B34- auf der Rückseite aus. - Verbinden Sie gegebenenfalls ein optional erhältliches Netzteil (DC 6V, 1.5 A) mit der DC-Buchse -B36- des Geräts. Stecken Sie nun den Netzadapter in eine freie Steckdose. - Verbinden Sie anschließend das mitgelieferte USB-Kabel mit dem Anschluss -B38- auf der Rückseite des Gerätes und einer freien USB-Schnittstelle an Ihrem Computer. 3.
HINWEIS! Audio Setup: Reloop Contour Controller Edition bietet im Gegensatz zur Interface Edition kein intergriertes Audio-Interface. Damit Sie trotzdem etwas hören können, verwenden Sie Ihre interne ComputerSoundkarte und konfigurieren diese entsprechend den Hinweisen der DJ-Software-Bedienungsanleitung. Es wird allerdings empfohlen, eine externe, ASIO-fähige Soundkarte, wie die Reloop Play, für die Audioausgabe zu verwenden. 3.
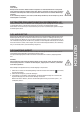
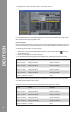
4. Betätigen Sie nun die Schaltfläche „Add...“ und wählen „Import“. DEUTSCH Im Auswahlfenster öffnen Sie die Mapping-Datei, die sich auf der CD befindet oder gerade von der Reloop-Supportseite heruntergeladen wurde. Problembehebung Sollte ein Problem auftauchen, wobei Contours LEDs nicht ordnungsgemäß aufleuchten, so liegt es in den meisten Fällen an installierter MIDI-Software (z.B. MidiYoke, Maple Virtual MIDI cable, etc.). Zur Behebung des Problems wie folgt vorgehen: 1.
4. Bedienung Nachdem Reloop Contour angeschlossen und richtig in der DJ-Software Traktor konfiguriert wurde, kann diese nun bedient werden. Wird Traktor Pro verwendet, so kann die Contour Bedienoberfläche voll ausgeschöpft werden. Für Traktor LE ergeben sich, insbesondere für die Effektsteuerung, die Anzahl der verwendbaren Decks und die Hot Cue-Belegung einige Unterschiede. HINWEIS! Im Folgenden wird die gesamte Traktor-Funktionsbelegung beschrieben.
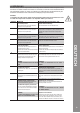
Element Funktion T10 Effektparameter Im Advanced Effekt-Modus lassen sich hiermit die Parameter schnell verändern. Dry/Wet-Fader Wird der Chained Effekt-Modus verwendet, so lassen sich die einzelnen Effekte mit den Fadern steuern. Funktion bei aktivem Shift -T29Equalizer-Regler Bewegen der Fader stellt die Parameter des Equalizers ein. Der 1. Fader von links steuert die Höhen, der 2. Fader die Mitten und der 3. Fader die Tiefen, die anschließend hörbar sind.
Funktion bei aktivem Shift -T29Linksläufige GRID-Verschiebung Verschiebt das Raster, das Traktor über die Bassline legt, ein Stück nach links. Rechtsläufige GRID-Verschiebung Verschiebt das Raster, das Traktor über die Bassline legt, ein Stück nach rechts. Während dieser Knopf gedrückt gehalten wird, lassen sich gespeicherte Hot CuePunkte durch Drücken der entsprechenden Hot Cue-Pads -T24- löschen. Die LED des jeweiligen Pads erlischt.
Element Funktion Funktion bei aktivem Shift -T29Wird nur der gummierte Rand für die Drehbewegung berührt, so lässt sich die Deck-Lautstärke sehr genau regeln. HINWEIS! Der letzte Modus ist nur in Traktors Internal-Modus von Bedeutung. T28 Jog Wheel Hiermit lassen sich verschiedene Funktionen ansteuern. Bitte sehen Sie sich dazu die Jog Wheel Modi-Tasten -T27- an. T29 Shift-Taste Durch Drücken dieser Taste erhalten alle Bedienelemente auf dem Gerät eine andere Funktionsbedeutung.
5. Abschließendes Drücken der Shift-Taste -T29- speichert die Auswahl und startet den Controller neu. Die neuen MIDI-Channels wurden ausgewählt. 5.2 Jog Wheel-Kalibrierung Sollte das Jog Wheel -T28- nicht mehr richtig reagieren, so kann dessen Berührungsempfindlichkeit neu kalibriert werden. Gehen Sie hierzu wie folgt vor. 1. Stellen Sie sicher, dass Contour ausgeschaltet ist (siehe Stellung Ein/Aus-Schalter -B34-). 2.
7. Anhang 7.1 Systemanforderungen Traktor LE PC: - Windows XP (Service Pack 2), Vista (32-Bit) - Pentium III, 1 GHz oder Athlon XP 1,4 GHz - 512 MB RAM Mac: - Mac OS 10.4 - G4 1,5 GHz oder Intel Core Duo Familie - 512 MB RAM 7.
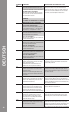
I/O 1 FUNCTION I TRAX 2 I FX SEL 3 I FX 1 SEL 4 I FX 2 SEL 5 I FX 3 SEL 6 I -LENGTH+ 7 I -MOVE+ BX 09 9X 09H/49H(SHIFT ON) 0B BX 0AH/4AH(SHIFT ON) LEFT:40H-N/RIGHT:40H+N 09 9X 0AH/4AH(SHIFT ON) 0B BX 0BH/4BH(SHIFT ON) LEFT:40H-N/RIGHT:40H+N 09 9X 0BH/4BH(SHIFT ON) 0B BX 0CH/4CH(SHIFT ON) LEFT:40H-N/RIGHT:40H+N 09 9X 0CH/4CH(SHIFT ON) 0B BX 0DH/4DH(SHIFT ON) LEFT:40H-N/RIGHT:40H+N 09 9X 0DH/4DH(SHIFT ON) 0B BX 16H/56H(SHIFT ON) LEFT:40H-N/RIGHT:40H+N 09 9
I/O KEY LED FUNCTION CODE ACTION 1 O 1 09 9X 01H/41H(SHIFT ON) 7FH:ON/00H:OFF 2 O 2 09 9X 02H/42H(SHIFT ON) 7FH:ON/00H:OFF 3 O 3 09 9X 03H/43H(SHIFT ON) 7FH:ON/00H:OFF 4 O 4 09 9X 04H/44H(SHIFT ON) 7FH:ON/00H:OFF 5 O a 09 9X 05H (SHIFT ON) 7FH:ON/00H:OFF 6 O b 09 9X 06H (SHIFT ON) 7FH:ON/00H:OFF 7 O c 09 9X 07H (SHIFT ON) 7FH:ON/00H:OFF 8 O d 09 9X 08H (SHIFT ON) 7FH:ON/00H:OFF 9 O FX ON 09 9X 0EH/4EH(SHIFT ON) 7FH:ON/00H:OFF 10 O RST 09 9X 0
7.3 Tipps zur Fehlerbehebung Sollten Probleme bei der Benutzung von Reloop Contour auftreten, so ist dies Ihre erste Anlaufstelle, um diese zu beheben: SYMPTOME MÖGLICHE URSACHEN KORREKTURMAßNAHMEN Das Gerät bekommt keinen Strom, wenn man es mit dem EIN/AUS-Schalter -B34einschaltet USB-Kabel bzw. Netzstecker nicht richtig verbunden Überprüfen Sie, ob das USB-Kabel richtig mit einem USB-Port Ihres Computers und Contour‘s USB-Port -B38- verbunden ist.
Operation Manual CAUTION! For your own safety, please read this operation manual carefully before initial operation! All persons involved in the installation, setting-up, operation, maintenance and service of this device must be appropriately qualified and observe this operation manual in detail. This product complies with the requirements of the applicable European and national regulations. Conformity has been proven. The respective statements and documents are deposited at the manufacturer.
ENGLISH tion to this device any warrantyclaims are excluded. - The inside of the device does not contain any parts which require maintenance, with the exception of wear parts that can be exchanged from the outside. Only qualified staff must carry out maintenance, otherwise warranty does not apply! - The Fuse must exclusively be exchanged against fuses of the same class, with the same trigger features and nominal current rating.
application that does not comply with the specified purpose harbours risks such as short circuit, fi re, electrical shock, etc. - The serial number determined by the manufacturer must never be removed to uphold the warranty rights. MAINTENANCE - Check the technical safety of the device regularly for damage to the mains cord or the casing, as well as for wearout of wear parts such as rotary knobs and sliding faders.
1.1 Control Elements ENGLISH Surface T1. FX 1 Routing Button (Shift: Master Deck Assignment) [Traktor Pro] T2. FX 2 Routing Button (Shift: Snap Mode) [Traktor Pro] T3. FX 3 Routing Button (Shift: Quantize Mode) [Traktor Pro] T4. FX 4 Routing Button (Shift: LFO Reset) [Traktor Pro] T5. TRAX Encoder (Shift: Folder Navigation) T6. Deck Assignment Buttons (Shift: Deck Cue) T7. Dry/Wet Fine Adjustment (Shift: Effect Change in Advanced Effect Mode) T8. Dry/Wet Fader (Shift: Headphones Volume) T9.
2. Device Setup - First make sure to turn off the device via the ON/OFF Button -B34- on the rear panel. - If required connect an optionally available mains adapter (DC 6V, 1.5 A) to the device‘s DC jack -B36-. Now connect the cord to a power outlet. - Then connect the included USB cable to the corresponding connection -B38- on the device‘s rear panel and a free USB port of your computer. 3. Computer Configuration Before you can use your new device a few basic computer adjustments have to be carried out.
NOTE! Audio Setup The Reloop Contour Controller Edition does not feature an integrated audio interface as opposed to the Interface Edition. In order to be able to hear something nonetheless, it is necessary that you use your internal computer soundcard which has to be configured according to the directions of the DJ software‘s instruction manual. However, for audio output it is recommended to use an external, ASIO compatible soundcard, such as Reloop Play. 3.
4. Now select the button „Add...“ followed by „Import“. ENGLISH In the selection screen open the mapping file that is on the CD or that was downloaded from the Reloop support site. Troubleshooting Should a problem arise and Contour‘s LEDs are not lit correctly, then this is probably caused in most cases by installed MIDI software (e.g. MidiYoke, Maple Virtual MIDI Cable, etc.) In order to solve the problem proceed as follows: 1.
4. Operation After connecting and configuring Reloop Contour correctly for the DJ software, Traktor can now be used. If Traktor Pro is used it is possible to fully exploit the Contour user interface. There are some differences for Traktor LE regarding effect control, the number of usable decks and the hot cue assignment. NOTE! In the following the whole Traktor function assignment will be described.
ElemenT Function T10 Effect Parameter In Advanced Effect Mode the parameters can be changed quickly hereby. Dry/Wet Fader If Chained Effect Mode is used the single effects can be controlled via the faders. Function with activated Shift -T29Equalizer Controller By moving the fader the equalizer‘s parameters can be adjusted.
Function with activated Shift -T29Right-Sided GRID-Shift Shifts the grid that Traktor puts over the bass line a step to the right. Jog Wheel Mode Buttons In Shift mode there is a mode at your disposal that determines the Jog Wheel‘s -T28- function. TRAX By turning the Jog Wheel -T28- while holding the Shift Button simultaneously the navigation will be significantly accelerated. Also quick search for a track will be facilitated.
ENGLISH ElemenT Function T28 Jog Wheel Herewith it is possible to control various functions. Please observe the Jog Wheel Mode Buttons -T27- regarding this. T29 Shift Button By pressing this button all control elements on the device will receive a further function. The assignment can be found in the right column of this chart. T30 Cup Button As long as this button is pressed the deck will return to the last set cue point and then stop. When the button is released, playback will start.
5. By pressing the Shift Button -T29- one last time the selection is saved and the Controller will be rebooted. The new MIDI channels have now been determined. 5.2 Jog Wheel Calibration Should the Jog Wheel -T28- not react correctly any more, its touch-sensitivity can be recalibrated. Proceed as follows. 1. Make sure that Contour is turnd off (see ON/OFF Button -B34-). 2. Press and hold the Play/pause Button -T32- and turn on Contour via the ON/OFF Button -B34-. 3.
7. Appendix 7.1 System Requirements Traktor LE PC: - Windows XP (Service Pack 2), Vista (32-bit) - Pentium III, 1 GHz or Athlon XP 1.4 GHz - 512 MB RAM Mac: - Mac OS 10.4 - G4 1,5 GHz or Intel Core Duo Family - 512 MB RAM 7.
I/O 1 FUNCTION I TRAX 2 I FX SEL 3 I FX 1 SEL 4 I FX 2 SEL 5 I FX 3 SEL 6 I -LENGTH+ 7 I -MOVE+ BX 09 9X 09H/49H(SHIFT ON) 0B BX 0AH/4AH(SHIFT ON) LEFT:40H-N/RIGHT:40H+N 09 9X 0AH/4AH(SHIFT ON) 0B BX 0BH/4BH(SHIFT ON) LEFT:40H-N/RIGHT:40H+N 09 9X 0BH/4BH(SHIFT ON) 0B BX 0CH/4CH(SHIFT ON) LEFT:40H-N/RIGHT:40H+N 09 9X 0CH/4CH(SHIFT ON) 0B BX 0DH/4DH(SHIFT ON) LEFT:40H-N/RIGHT:40H+N 09 9X 0DH/4DH(SHIFT ON) 0B BX 16H/56H(SHIFT ON) LEFT:40H-N/RIGHT:40H+N 09 9
I/O KEY LED FUNCTION CODE ACTION 1 O 1 09 9X 01H/41H(SHIFT ON) 7FH:ON/00H:OFF 2 O 2 09 9X 02H/42H(SHIFT ON) 7FH:ON/00H:OFF 3 O 3 09 9X 03H/43H(SHIFT ON) 7FH:ON/00H:OFF 4 O 4 09 9X 04H/44H(SHIFT ON) 7FH:ON/00H:OFF 5 O a 09 9X 05H (SHIFT ON) 7FH:ON/00H:OFF 6 O b 09 9X 06H (SHIFT ON) 7FH:ON/00H:OFF 7 O c 09 9X 07H (SHIFT ON) 7FH:ON/00H:OFF 8 O d 09 9X 08H (SHIFT ON) 7FH:ON/00H:OFF 9 O FX ON 09 9X 0EH/4EH(SHIFT ON) 7FH:ON/00H:OFF 10 O RST 09 9X 0
7.3 Troubleshooting If any problem should arise while using Reloop Contour the following chart is the first drop-in center: Symptoms Possible Causes Corrective Measures The device does not receive any power when turning it on via the ON/OFF Button -B34-. USB cord or mains adapter are not correctly connected. Check whether the USB cord is correctly connected to a free USB port of your computer and Contour‘s USB port -B38-.
Mode d’emploi ATTENTION! Pour votre propre sécurité, veuillez lire attentivement ce mode d‘emploi avant la première utilisation ! Toutes les personnes chargées de l’installation, de la mise en service, de l’utilisation, de l’entretien et la maintenance de cet appareil doivent posséder les qualifications nécessaires et respecter les instructions de ce mode d‘emploi.
FRANCAIS cet appareil. Tous les dégâts dus à une modification de cet appareil ne sont pas couverts par la garantie. - Le boîtier ne contient aucune pièce nécessitant un entretien, à l’exception de pièces d’usure pouvant être remplacées de l’extérieur.
- Toute utilisation non conforme peut endommager le produit et annuler les droits de garantie. En outre, toute utilisation autre que celle décrite dans ce mode d’emploi peut être source de courtscircuits, incendies, décharge électrique, etc. - Le numéro de série attribué par le fabricant ne doit jamais être effacé sous peine d’annuler les droits de garantie. ENTRETIEN - Contrôlez régulièrement le bon état de l’appareil (boîtier, cordon) et l’usure éventuelle des molettes et curseurs.
1.1 Éléments de commande FRANCAIS Face supérieure de l‘appareil T1. FX 1 Touche de routage (Maj : affectation platine Master) [Traktor Pro] T2. FX 2 Touche de routage (Maj : mode Snap) [Traktor Pro] T3. FX 3 Touche de routage (Maj : mode Quantize) [Traktor PRO] T4. FX 4 Touche de routage (Maj : LFO Reset) [Traktor Pro] T5. TRAX-Encoder (Maj : navigation dans les dossiers) T6. Touches d‘affectation de platine (Maj : Deck Cue) T7.
2. Installation de l‘équipement - Commencer par éteindre l‘appareil avec l‘interrupteur marche/arrêt -B34- situé sur la face arrière. - Le cas échéant, brancher un bloc d‘alimentation optionnel (DC 6V, 1.5 A) dans la prise DC -B36de l‘appareil. Brancher à présent l‘adaptateur secteur dans une prise de courant libre. - Raccorder ensuite le câble USB fourni au port -B38- situé sur la face arrière de l‘appareil et à un port USB libre de votre ordinateur. 3.
NOTE Audio Setup Contrairement à la Interface Edition, Reloop Contour Controller Edition n‘offre pas un interface audio intégré. Afin que vous pouvez écouter quelque chose c‘est nécessaire d‘utiliser votre carte son interne de votre ordinateur et configurer la carte son en fonction du mode d‘emploi de votre logiciel DJ. Mais nous proposons d‘ utiliser une carte son externe et compatible avec ASIO, telles que Reloop Play. 3.
4. Cliquer à présent sur le bouton „Add...“ et sélectionner „Import“. FRANCAIS Dans la fenêtre de sélection, ouvrir le fichier de mappage situé sur le cédérom ou téléchargé du site Reloop. Dépannage Si un problème survient et que les DEL de la console Contour ne s‘allument pas correctement, la panne vient généralement du logiciel MIDI installé (par ex. MidiYoke, Maple Virtual MIDI cable, etc.). Procéder comme suit pour le dépannage : 1.
4. Utilisation Maintenant que votre console Reloop Contour est correctement raccordée et configurée dans le logiciel Traktor, vous pouvez l‘utiliser. Si Traktor Pro est utilisé, l‘interface de commande Contour peut être exploitée sans restrictions. Par contre, il existe quelques différences pour Traktor LE, spécialement concernant la commande des effets, le nombre de platines utilisables et l‘affectation Hot Cue. NOTE L‘affectation complète des fonctions de Traktor est décrite plus bas.
Élément Fonction T10 Paramètre d‘effet Permet de modifier rapidement les paramètres en mode d‘effets Advanced. Curseur Dry/Wet Si le mode d‘effets Chained est utilisé, les différents effets peuvent être commandés avec les curseurs. T11 T12 FRANCAIS T13 T14 T15 T16 T17 T18 T19 T20 T21 42 NOTE Dans Traktor LE, seul le premier paramètre fonctionne en mode d‘effets Chained. Touche FX On
Fonction avec touche Maj enfoncée : -T29Décalage GRID vers la droite Décale la grille affichée par Traktor sur la ligne des graves vers la droite. Touches de mode Jog Wheel Lorsque la touche Maj est enfoncée, un mode permettant de définir la fonction de la Jog Wheel -T28- est disponible : TRAX Tourner la Jog Wheel -T28- en enfonçant la touche Maj pour accélérer considérablement la navigation. Permet également la recherche rapide d‘une piste.
FRANCAIS Élément Fonction T28 Jog Wheel Permet de commander diverses fonctions. Veuillez consulter les touches de mode Jog Wheel -T27-. T29 Touche Maj Enfoncer cette touche pour accéder à la deuxième fonction de tous les éléments de commande de l‘appareil. L‘affectation actuelle est indiquée dans la colonne droite de cette table. T30 Touche Cup Tant que cette touche est enfoncée, la platine saute au dernier point Cue réglé et s‘arrête. La lecture reprend lorsque la touche est relâchée.
5. Ôter le doigt de la surface et appuyer ensuite sur la touche Play/Pause -T32- pour achever le calibrage. Le contrôleur redémarre automatiquement. 5.2 Calibrage de la Jog Wheel Si la Jog Wheel -T28- ne réagit plus correctement, il est possible de recalibrer sa sensibilité au toucher. Procéder comme suit. 1. Vérifier que votre Contour est éteint (voir Position de l‘interrupteur marche/arrêt -B34-). 2.
7. Annexe 7.1 Matériel requis Traktor LE PC: - Windows XP (Service Pack 2), Vista (32-Bit) - Pentium III, 1 GHz ou Athlon XP 1,4 GHz - 512 MB RAM Mac: - Mac OS 10.4 - G4 1,5 GHz ou Intel Core Duo Familie - 512 MB RAM 7.
I/O 1 FUNCTION I TRAX 2 I FX SEL 3 I FX 1 SEL 4 I FX 2 SEL 5 I FX 3 SEL 6 I -LENGTH+ 7 I -MOVE+ BX 09 9X 09H/49H(SHIFT ON) 0B BX 0AH/4AH(SHIFT ON) LEFT:40H-N/RIGHT:40H+N 09 9X 0AH/4AH(SHIFT ON) 0B BX 0BH/4BH(SHIFT ON) LEFT:40H-N/RIGHT:40H+N 09 9X 0BH/4BH(SHIFT ON) 0B BX 0CH/4CH(SHIFT ON) LEFT:40H-N/RIGHT:40H+N 09 9X 0CH/4CH(SHIFT ON) 0B BX 0DH/4DH(SHIFT ON) LEFT:40H-N/RIGHT:40H+N 09 9X 0DH/4DH(SHIFT ON) 0B BX 16H/56H(SHIFT ON) LEFT:40H-N/RIGHT:40H+N 09 9
I/O KEY LED FUNCTION CODE ACTION 1 O 1 09 9X 01H/41H(SHIFT ON) 7FH:ON/00H:OFF 2 O 2 09 9X 02H/42H(SHIFT ON) 7FH:ON/00H:OFF 3 O 3 09 9X 03H/43H(SHIFT ON) 7FH:ON/00H:OFF 4 O 4 09 9X 04H/44H(SHIFT ON) 7FH:ON/00H:OFF 5 O a 09 9X 05H (SHIFT ON) 7FH:ON/00H:OFF 6 O b 09 9X 06H (SHIFT ON) 7FH:ON/00H:OFF 7 O c 09 9X 07H (SHIFT ON) 7FH:ON/00H:OFF 8 O d 09 9X 08H (SHIFT ON) 7FH:ON/00H:OFF 9 O FX ON 09 9X 0EH/4EH(SHIFT ON) 7FH:ON/00H:OFF 10 O RST 09 9X 0
7.3 Conseils de dépannage Si vous avez des problèmes lors de l‘utilisation de votre Reloop Contour, consultez cette ressource en premier recours pour dépanner : Symptôme Causes possibles Dépannage L‘appareil ne se met pas sous tension lorsque vous appuyez sur l‘interrupteur MARCHE/ARRÊT -B34-. Branchement incorrect du câble USB ou de la fiche secteur. Vérifier le branchement correct du câble USB sur un port USB de votre ordinateur et sur le port USB -B38de votre Contour.
NOTIZEN / NOTES / NOTE 50
NOTIZEN / NOTES / NOTE 51
www.reloopdj.com Reloop Distribution Global Distribution GmbH Schuckertstrasse 28 48153 Münster / Germany Fax: +49.251.