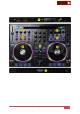
VirtualDJ 8 – Reloop Beatpad 1
Table of Contents INSTALLATION ......................................................................................................................... 3 Firmware & Drivers ................................................................................................................ 3 VirtualDJ 8 Setup ................................................................................................................... 3 Advanced Setup .......................................................................
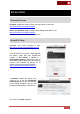
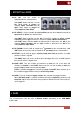
INSTALLATION Firmware & Drivers Firmware: Update the firmware of the unit to the latest version from http://www.reloop.com/reloop-beatpad Drivers (for Windows only): Install the latest Reloop ASIO drivers from http://www.reloop.com/reloop-beatpad No drivers are required for Mac OSX computers VirtualDJ 8 Setup Download and install VirtualDJ 8 from http://www.virtualdj.com/download/index.html (in case you have not done already) Once VirtualDJ 8 is launched, a Login Window will appear.
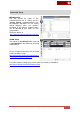
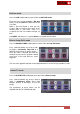
Advanced Setup MIDI Operation The unit should be visible in the CONTROLLERS tab of Config and the “factory default” available/selected from the Mappings drop-down list. The factory default Mapping offers the functions described in this Manual, however those can be adjusted to your needs via VDJ Script actions. Find more details at http://www.virtualdj.com/wiki/VDJscript.html AUDIO Setup The unit has a pre-defined Audio setup and a special button in the AUDIO tab of Config to provide that. .
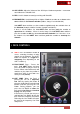
VirtualDJ 8 – Reloop Beatpad 5
A. MIXER & BROWSER 1. CROSSFADER. Blends audio between left and right mixer channels. 2. VOLUME. Adjust the Volume of each channel. If Fader Start is enabled (3) the deck will stop at the previously used Cue if the Volume Fader reaches the minimum position and will start playing if the Volume fader moves from the minimum position. 3. LOAD. Press these buttons to load the selected track from the Browser to left or right deck. The LED of the button will be on if the deck is loaded.
12. AUX LEVEL. Adjust the Volume of the AUX Input. Hardware operation – movement not visible on the VirtualDJ GUI. 13. REC. Use this button to record your mixing with VirtualDJ. 14. BROWSE ENC. Scroll through files of folders. Push the encoder to set focus to the next available/visible Browser window (Folders, Songs List and Sideview). Hold SHIFT down and then use the encoder to cycle through the available views of the Sideview (Automix, Sidelist, Karaoke, Sampler and Clones).
To continue playback without returning to the Temporary Cue Point, press and hold the Cue Button, then press and hold the Play Button (15) and then release both buttons. Hold SHIFT down and then press this button to stop the track with a gradual brake effect. 17. SET CUE. This button has the same functionality as the JUMP CUE (16) with the difference that the deck will stop to the Cue point if the deck is playing. Hold SHIFT down and then press this button to enable/disable Master Tempo (Keylock) 18. SYNC.
C. EFFECTS & LOOPS 24. FX ON. Use this button enable/disable the selected effect. to Hold SHIFT down and then use left FXON button to trigger selected Video Transition and right FXON button to trigger selected Master Video Effect. the the the the 25. FX SELECT. Use this encoder to select an Effect for this deck. Push the encoder to open/close the GUI of the selected effect.
HotCues mode Press the CUE mode button to set the PADs to HOT CUE mode. Each one of the 4 pads assigns a Hot Cue Point (1 to 4) or returns the track to that Hot Cue Point. When a Hot Cue Button is unlit, you can assign a Hot Cue Point by pressing it at the desired point in your track. Once it is assigned, the Hot Cue Button will light up blue. Hold SHIFT and then press a pad to delete its assigned Hot Cue Point. Bounce Loop (Roll) mode Press the BOUNCE LOOP mode button to set the PADs to Loop Roll mode.
Sampler mode Press the SAMPLER mode button to set the PADs to Sampler mode. Each one of the pads triggers a sample from the selected Sampler Bank of VirtualDJ. If a bank has less than 5 samples, both sides of the Beatpad will control the same samples. If a bank has more than 4 samples, the left side of the Beatpad will control samples 1 to 4 and the right side samples 5 to 8.
G. REAR 35. AUX INPUT. Connect your audio sources to this RCA input. The input can accept both line and phono-level signals, depending on the switcher next to the Input. 36. MASTER OUTPUT (RCA): Use standard RCA cables to connect this output to a speaker or amplifier system. The level of this output is controlled by the Master knob on the top panel. 37. MASTER OUTPUT (XLR): Connect this low-impedance XLR output to a PA system or powered monitors.
H. INPUTS & RECORDING The Beatpad offers 2 Inputs, an AUX at the rear side and a Microphone Input at the front. However none of these Inputs can be routed to the software mixer and recorded (or broadcasted). The input signal of both Inputs is directly routed to the Master Output of the Beatpad (Hardware inputs).
Useful links VirtualDJ web-page: http://www.virtualdj.com VirtualDJ Support Center: http://www.virtualdj.com/contact/index.html VirtualDJ 8 Operation Guides: http://www.virtualdj.com/wiki/PDFManuals.html Reloop web-page: http://www.reloop.com/ Reloop Support Center: http://support.reloopdj.com/ Reloop Beatpad product page: http://www.reloop.com/reloop-beatpad Reloop Beatpad User Guide: http://www.reloop.com/media/catalog/product/pdf/2/2/6/226018_Reloop_IM.