VirtualDJ 8 – Reloop Beatmix 4 1
Table of Contents INSTALLATION ......................................................................................................................... 3 Firmware & Drivers ................................................................................................................ 3 VirtualDJ 8 Setup ................................................................................................................... 3 Advanced Setup .......................................................................
INSTALLATION Firmware & Drivers Firmware: Update the firmware of the unit to the latest version from http://www.reloop.com/reloop-beatmix-4 Drivers (for Windows only): Install the latest Reloop ASIO drivers from http://www.reloop.com/reloop-beatmix-4 No drivers are required for Mac OSX computers VirtualDJ 8 Setup Download and install VirtualDJ 8 from http://www.virtualdj.com/download/index.html (in case you have not done already) Once VirtualDJ 8 is launched, a Login Window will appear.
Advanced Setup MIDI Operation The unit should be visible in the CONTROLLERS tab of Config and the “factory default” available/selected from the Mappings drop-down list. The factory default Mapping offers the functions described in this Manual, however those can be adjusted to your needs via VDJ Script actions. Find more details at http://www.virtualdj.com/wiki/VDJscript.html AUDIO Setup The unit has a pre-defined Audio setup and a special button in the AUDIO tab of Config to provide that.
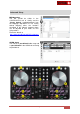
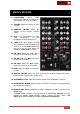
A. TRANSPORT 1. SHIFT. Press and hold this button to access secondary functions of other controls on the Beatmix 4. 2. SYNC. Press this button to automatically match the corresponding Deck's tempo with the opposite Deck's (or the Master Deck’s if using a 4 decks Skin) tempo and phase. Hold SHIFT down and then press this button to set this deck as Master Deck (for 4 decks skins). 3. CUP. Press this button to return to the last paused position and play the track from there when the button is released.
B. TEMPO & JOG 7. PITCH. Controls the track's playback tempo. The blue led indicates that the pitch fader of the unit is on zero (center) position 8. PITCH-. Press and keep holding this button down to temporary slowdown the speed of the track. Hold SHIFT down and then press this button to select the Single FX mode (see EFFECTS) 9. PITCH+. Press and keep holding this button down to temporary speed up the track. Hold SHIFT down and then press this button to select the Multi FX mode (see EFFECTS) 10.
1. When the knob is at the minimum position (0%), the effect is not active (off). At any other position the effect is active (on). In Single Effect mode the knob controls the 1st parameter of the selected effect. Hold SHIFT down and then use this knob to control the 4th parameter of the selected Effect 12. FX2 knob. In Multi Effect mode the knob controls the 1st parameter of the selected effect of FX Slot 2. Hold SHIFT down and use this knob to select the next effect for the Effect Slot 2.
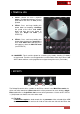
HotCues-Loop mode Press the PAD MODE button A to set the PADs to Hotcues-Loop mode. Each one of the 4 top pads assigns a Hot Cue Point (1 to 4) or returns the track to that Hot Cue Point. When a Hot Cue Button is unlit, you can assign a Hot Cue Point by pressing it at the desired point in your track. Once it is assigned, the Hot Cue Button will light up blue. Each one of the 4 bottom pads triggers a loop of a different size (in beats), as per the image.
Hold SHIFT down to receive parameters of the Sampler. additional Use Pads 1 to 4 to select the 4 first (default) banks of VirtualDJ Sampler Use Pads 4 to 8 to select the sampler trigger mode (On/off, Hold, Stutter and Unmute) HotCues-Sampler mode Press both the PAD MODE buttons A and B to set the PADs to HotCues-Sampler mode. Each one of the 4 top pads assigns a Hot Cue Point (1 to 4) or returns the track to that Hot Cue Point.
E. MIXER & BROWSER 17. CROSSFADER. Blends audio between the channels assigned to the left and right side of the crossfader. 18. VOLUME. Adjust the Volume of each channel. 19. SAMPLER VOLUME. Adjust the Volume of the Master Sampler Output. 20. CUE. Press these buttons to send each channel/deck to the Headphones Output Channel (PFL) 21. LOAD. Press these buttons to load the selected track from the Browser to decks 1 to 4. Hold SHIFT down and then press one of these buttons to enable the Fader Start on a deck.
17. BACK. Press this button to set focus to the Folders List. If focus is on the Folders List, use this button to open/close subfolders. Hold SHIFT down and then use this button to set focus to the previous Browser Window (Folders List, Songs List and Sideview). F. INPUTS & RECORDING The Reloop Beatmix 4 does not offer any Input Channels for the built-in audio interface.