
Operating instructions


5
Commissioning
Unpack the stamp, connect the mains unit to the charging station,
plug in the mains unit, and switch on the power supply.
Note: Use only original REINER components!
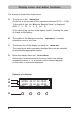
Place jetStamp in the charging station, take care of the following points:
• Engage the notch (9) and place jetStamp in the charging station
• Allow at least 14 hours for the first charging, subsequently,
approximately three hours are required for charging.
The state of charge of the battery is shown in the top right-hand
corner of the display by the battery symbol .
While charging is taking place, the green charging indicator light (3)
on the charging station is illuminated.
• Avoid exposing the jetStamp to direct sunlight.
For permissible ambient temperature, see page 23, 'Technical data'
Installing ink cartridge:
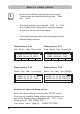
Press [ MODE ] if necessary repeatedly, until the menu item
“INKJET” appears in the lower line of the display (menu bar)
Press [ INKJET ] : For easier handling, the print
carriage moves automatically to the centre of its travel
Take the ink cartridge out of its packing (follow the manufactures’s
instructions!)
Press the locking rail (7) to the rear and insert the ink cartridge
into the print carriage with its grip (8) towards you
Pull the locking rail (7) forwards again until it engages
Press [ INKJET ] to transport the print carriage back
to its start position
7
8
3
9