
User`s guide

8 13800-101-Rev. A
Care and Maintenance
WARNING: Risk of electric shock. Always disconnect
the power cord from the wall and the instrument
before performing any of the following care and
maintenance procedures.
CHANGING THE HALOGEN BULB
WARNING: Do not touch the Halogen Bulb if the unit
has been in use. To remove the Halogen Bulb, use a
thick cloth or wait until it has cooled.
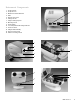
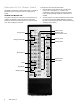
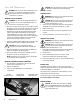
1. Open the top portion of the projector housing by loosening
the hexagon screw located underneath the front portion of
the AP250 head (see "Instrument Components, p. 3, #6).
Simultaneously grasp the Halogen Bulb Fastening Knob
and the copper plate located beneath it. (see Figure 8,
below). Slightly turn the knob counterclockwise, being
careful not to allow the copper plate or knob to disengage.
Continue turning slowly until both the knob and copper
plate are loose enough to fall into your hand.
2. Remove the Halogen Bulb by lightly pulling upwards on the
Halogen Bulb Connection and then replace the Bulb.
CAUTION: Do not touch the Halogen Bulb as
fingerprints on the glass will shorten the Bulb's life.
3. Make sure the Bulb is correctly seated in the holder and
tighten the Halogen Bulb Fastening Knob.
4. Shut the top portion of the projector housing; reconnect
the power cord and turn the projector on.
NOTE: If illumination is not uniform, call your Leica dealer
or our Customer Service department.
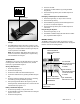
CHANGING THE REMOTE CONTROL'S BATTERIES
1. Open the battery compartment on the rear side of the
remote control (see Figure 7, p. 7).
2. Remove four batteries.
3. Insert four new AAA batteries and close battery
compartment.
Halogen
Bulb Connection
Halogen Bulb
Fastening Knob
Figure 8 - Replacing the Halogen Bulb.
CAUTION: Observe polarization markings on the inside
of the battery compartment and insert batteries
accordingly.
CHANGING FUSES
WARNING: Risk of electric shock. Always disconnect
the power before changing fuses.
CAUTION: Make sure the rating of the inserted fuses
complies with the power requirements listed under
Technical Specifications on p. 9.
1. Pull out the fuse compartment located on the backside of
the AP250 (see "Instrument Components, p. 3, #10).
2. Replace burnt fuses.
3. Insert the fuse holder into the fuse compartment until it
snaps in.
4. Reconnect the power cord and turn the projector on.
CHANGING THE VOLTAGE
WARNING: Risk of electric shock. Always disconnect
the power before changing fuses.
CAUTION: Make sure the rating of the inserted fuses
complies with the power requirements listed under
Technical Specifications on p. 9
1. Pull out the fuse compartment located on the backside of
the AP250 (see "Instrument Components, p. 3, #10).
2. Remove fuses.
3. Pull out white voltage indicator and rotate it so the
indicator line matches the desired line voltage.
4. Insert appropriate fuses (see p. 9, Technical Specifications,
Power Requirements).
ROUTINE CARE
The AP250 requires very little care. The exterior housing is
made from polycarbonate and can be cleaned with a mild soap
or detergent applied to a clean cloth.
The projector lens and window for remote detection can be
cleaned with a soft clean dry cloth.
To clean the remote control, wipe with a soft clean dry cloth.
Do not disassemble to clean lenses.
SCREEN CLEANING
CAUTION: The screen that came with your AP250
has an extremely high reflective characteristic. It is
very susceptible to abrasive scratches and finger
prints. Handle with care.
Copper Plate under
Fastening Knob