
User`s guide

13800-101-Rev. E
10
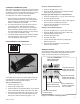
CHANGING THE REMOTE CONTROL BATTERIES
1. Open the battery compartment on the rear side of the
remote control (see Figure 6).
2. Remove the batteries.
3. Insert four new AAA batteries and close battery
compartment.
CAUTION: Observe polarization markings on
the inside of the battery compartment and
insert batteries accordingly.
CHANGING THE VOLTAGE / REPLACING FUSES
WARNING: Risk of electric shock. Always
disconnect the power before changing fuses.
CAUTION: Make sure the rating of the inserted
fuses complies with the rating specied on the
rating plate (see page 5, #8).
1. Pull out the fuse holder in the fuse compartment
located on the backside of the AP250 (see page 5,
#8).
2. Replace blown fuses.
3. Insert the fuse holder into the fuse compartment until
it snaps in.
4. Reconnect the power cord and turn the projector on.
CLEANING
The exterior housing can be cleaned with a mild soap
solution applied to a clean, soft cloth.
The projector lens and window for remote detection can
be cleaned with a soft, clean, optics-safe cloth.
To clean the remote control, wipe with a soft, clean,
dry cloth.
To clean the screen, wipe with a soft, clean, dry cloth.
CAUTION: The screen is very susceptible to
scratches and ngerprints. Handle with care.
Care and Maintenance
WARNING: Risk of electric shock. Always
disconnect the power cord from the wall and the
instrument before performing any of the following
care and maintenance procedures.
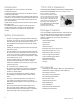
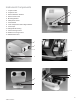
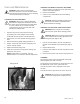
CHANGING THE HALOGEN BULB
WARNING: Never touch a Halogen Bulb with
bare hands as ngerprints will shorten the bulb
life. Never remove a bulb that has recently been
in use as it will be very hot. Wait until it has
cooled and use gloves or a thick cloth when
handling any halogen bulb.
1. Open the top portion of the projector housing
by loosening the 3 mm hexagon screw located
underneath the front portion of the AP250 head.
2. Remove the cover from the bulb housing (page 5,
#10).
3. Remove the bulb by lightly pulling upwards on it.
4. Position a new bulb over the pins and gently push
it down until fully seated.
5. Replace the bulb housing cover.
6. Close the top portion of the projector housing and
tighten the cover screw.
NOTE: If illumination is not uniform, call your
Reichert dealer or our Customer Service department.
Halogen Bulb
Figure 8 - Replacing the Halogen Bulb.