
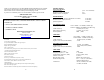
Product Manual


8
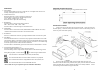
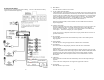
RADIO CONNECTIONS
Follow this easy wiring diagram when installing. Be sure to disconnect the battery
negative terminal before beginning.
5
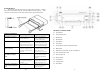
8) Mute Button
Press this button to mute the source audio.
9) TUNE / SEEK /TRACK Buttons
Under Radio mode, press the desired button to manually tune a station moving upward
or downward. Press and hold button momentarily and the radio will automatically seek
or down to the next available radio station. Press and hold button for 3 seconds and the
radio continuously tunes up or down until the button is released. These buttons also
function as Weather Band Channel 7 (162.550 MHz) access. Under weather band
mode, pressing these buttons will select weather band channels 1-7.
When playing digital media, use these buttons to track UP/DOWN to the desired
chapter to playback.
10) Auxiliary Input Jacks
The unit is equipped with a front panel 3.5mm auxiliary input so you can connect your
external portable audio player or portable satellite radio receiver. Press Mode to
display AUX 1 for operation. The radio is also equipped with a second Rear RCA
AUX 2 input. Press mode to display AUX 2 for operation.
*It may be necessary to adjust the volume level of your portable devise to achieve an
optimal volume level.
11) SD Card Input
Insert the SD card and the radio will automatically switch to the CARD input and
begin playback.
12) Display Button
Press this button to change display between available source information.
13) Clock Button
Press CLK button to change display between clock and source information.
Setting the Time:
With the radio on, press CLK button momentarily to display the time. Next, press and
hold the CLK button until the hour display begins to flash. Rotate Volume/Select Knob
to adjust the hour. Press the CLK button again, and the minute display will flash.
Rotate Volume/Select Knob to adjust the minute. Press Volume/Select to save the
desired time.
14) USB Input
Insert a USB drive and the radio will automatically switch to USB input and begin
playback.
**Note: The unit's USB port does not support the Apple iPod or iPhone.
15) Eject Button
Press this button to eject CD disc.