www.regency-fire.com WarmHearth Fireplace Regency WarmHearth High Efficiency EPA Certified Fireplace Owners & Installation Manual MODEL: Z2510L Tested by: Installer: Please complete the details on the back cover and leave this manual with the homeowner. Homeowner: Please keep these instructions for future reference. 908-200 FPI FIREPLACE PRODUCTS INTERNATIONAL LTD. 6988 Venture St.
Thank-you for purchasing a REGENCY FIREPLACE PRODUCT. The pride of workmanship that goes into each of our products will give you years of trouble-free enjoyment. This product has been certified by the Environmental Protection Agency of the United States. This means that it meets the strictest standards in providing you with the latest in clean burning technology and efficiency. Specifications may vary widely. Consult with your Regency Dealer for local considerations. Keep those REGENCY FIRES burning.
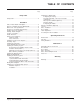
TABLE OF CONTENTS Page Safety Label Safety Label .......................................................................... 4 Installation Parts, Product Details and Options ..................................... 5 Before You Install the Regency WarmHearth ......................... 6 Dimensions and Specifications .......................................... 6 Clearances and Height Requirements ............................... 7 Fireplace Enclosure Framing ..............................................
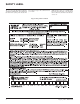
SAFETY LABEL This is a copy of the label that accompanies each Regency WarmHearth. It is located inside the lower louver opening on the left side. We have printed a copy of the contents here for your review. NOTE: Regency units are constantly being improved. Check the label on the unit and if there is a difference, the label on the unit is the correct one.
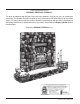
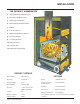
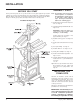
INSTALLATION THE REGENCY WARMHEARTH 1) Optional 24 Karat Gold-plated Louvers 2) Clean Glass Air Wash System 3) High Safety Ceramic Glass 4) Optional 24 Karat Gold-plated Door 5) Andirons 6) Convection Air Inlet 7) Optional 150 CFM 2-speed Blower 8) Convection Chamber 9) Secondary Air Source 10) Primary Air Source 11) 7-inch Flue Pipe 12) High Heat Refractory Lining PRODUCT DETAILS OPTIONS EPA Certified YES, Phase 2 Emissions 5.2 Gms/Hr. Blower 150 CFM, 2 speed Efficiency (DEQ) 70.
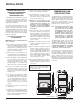
INSTALLATION READ BEFORE YOU INSTALL THE REGENCY WARMHEARTH HIGH EFFICIENCY EPA CERTIFIED FIREPLACE This installation manual will enable you to make a safe, efficient and dependable installation of your fireplace and chimney system. Please read and understand these instructions before beginning your installation. Do not alter or modify the fireplace or its components under any circumstances.
INSTALLATION FAILURE TO USE PARTS MANUFACTURED BY REGENCY FIREPLACE INDUSTRIES OR VARIATIONS IN TECHNIQUES AND CONSTRUCTION MATERIAL DESCRIBED IN THIS MANUAL MAY CREATE A FIRE HAZARD AND VOID REGENCY’S WARRANTY.
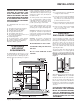
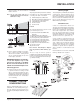
INSTALLATION Note: If the fireplace is being cantilevered through an outside wall, the entire enclosure (floor, wall and false ceiling) up to the first ceiling level must be completely insulated and vapor sealed and sheathed, to avoid transfer of cold air through the fireplace when not in use. FRAMING DETAILS Note: Ducting is tested at 1 in. clearance to framing for the first 6 feet and 1/2 in. thereafter and no stand-offs are required.
INSTALLATION support as well as the floor beneath the hearth extension. Note: The “Z” type safety strip is not supplied by Regency and must be fabricated locally. Chimney Height In Canada: Any factory built chimney listed and certified to ULC-S629. Also any of the following chimney covered by ULC-S610 or ULC S604. 1) 2) 3) 4) 5) 6) GSW Heating Products Model JFC Oliver McLeod Ltd. Model PRO-JET 3103 Security Chimney Ltd. Model ASHT Selkirk Metalbestos Model SS ICC Excel 103 HT ICC Excel 2100 In U.S.A.
INSTALLATION BEFORE YOU START ASSEMBLY STEPS Check your inventory list to be sure you have all the necessary parts supplied in good usable condition. Check for any concealed damage. Check the operation of the combustion air damper. When the damper is in the fully closed position, the damper handle should be to the right. When damper is in the fully open position, the damper handle must be in the left position. Note: The following steps represent the normal sequence of installation.
INSTALLATION result if stand-offs are not properly installed. uous floor or platform for support and to prevent cold air from entering the room from under the fireplace, if against an outside wall. The fireplace may be positioned and then the framing built around it, or the framing may be constructed and the fireplace positioned into the opening. The minimum ceiling height is 7 feet. When the unit is raised 4 inches above the floor the Regency Hearth Extension (Part# 000-910) is not required.
INSTALLATION b. Clear family members out of the area.
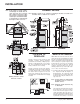
INSTALLATION INSTALLING THE OUTSIDE AIR KIT Combustion air is fed to the firebox through a connection on the rear lower left side of the unit. A free flowing supply of air must be available to this opening at all times. Combustion air may be taken from inside the building if the local building code allows, but performance may suffer. Also, it must go through the 4 in. duct to the connection on the left hand side.
INSTALLATION OPTION 2 External Blower with Thermo-Disc ing the thermodisc to the fireplace. The holes are on the right hand side just below the ashlip. The thermodisc allows the fireplace to warm up properly before the blower will switch on. The blower is also switched off if the fireplace temperature falls below suitable heating levels. 000-918 (Fastens to louvers) One-way Damper: Eight inch diameter butterfly valve necessary for external blower installation.
INSTALLATION 5) Install the connector collar into the unit making sure it is pushed all the way down. Reach through the upper louver opening and snip and bend out the lower edge of the collar in at least 4 places inside the fireplace with pliers so it can't be pulled out. Use high temperature silicone to seal the block-off plate to the unit. If necessary drill extra holes in the plate and the unit and secure with extra screws.
INSTALLATION be at the top so they lie flat. Bend out the lower edge of the valve at 4 places inside the fireplace with pliers so that it can't be pulled out again. Diagram 2. 6) Connect the inlet of the blower to the outlet of the valve using 8 inch diameter metal ducting (rigid or flex). Any other size will not work properly. 7) Duct-work can then be run to the desired rooms following good warm air distribution practices. Up to six 5 in. diameter runs can be installed from this system.
INSTALLATION Extend unit past studs so it is flush with sheeting. FINISHING THE WARMHEARTH Completing the Facing Facing materials must be thin veneer (non-self supporting facades) or self supporting facades. If you are installing a thin veneer facade the Regency Masonry Retainer Kit (Part # 000-920) is recommended. All facades must be NonCombustible such as brick, rock or ceramic tile.
INSTALLATION 4) Place side metal filler strips in between stove and framing to cover the stand-off space. Fit the strips behind "A" so that they cover the stand-offs, and will prevent mortar from falling through the mesh. Example 2: Face of Fireplace Flush with Wall Sheathing. 5) Center door arch edge, mark and drill holes. Note the top of the side pieces meet up with the edges of the center arch. Attach arch edge and bottom of grill edge to unit.
INSTALLATION MASONRY LINER/ BRICKS fit in order to prevent it from falling out when a fire is burning. Insulated refractory panels are included to extend the life of the fireplace and help radiate heat more evenly. Make sure Insulating Paper is in place along the bottom, side and rear before bricks are put into place. Insulation batt, 1 in. thick is placed above the top brick baffle. Using the diagram to find the correct location of the panels install in the following sequence: sides, rear, bottom, top.
MAINTENANCE CAUTION: Never leave unit unattended if door is left open. This procedure is for fire start-up only, as unit may overheat if door is left open for too long. The door is to be opened for a maximum of 5 minutes while loading or for ignition purposes only. 12) Green or wet wood is not recommended for your unit since most of the energy will be used to drive off the moisture instead of heating your home. As well, green or wet wood can result in dirty glass.
PARTS LIST PARTS LIST- FIREBOX & BODY 20) 21) 22) 23) 24) 25) 26) 27) 28) 29) Part # 948-102 000-198 * * * * * * 000-058 * Description Spring Handle - Small Hearth Extension Connector Shell Inner Sides & Back Insulation - Right Insulation - Rear Insulation - Rear - 6" wide Insulation - Left Insulation - Top Cover Duct Inner Shell Inner Top 40) 41) 42) 43) 44) 45) 46) 47) 48) 50) 51) 54) * Shell Outer Side & Back * Electrical Tube Plate 000-207/16 Electrical Tube 000-205 Cover Plate Outer Shell Vent 000-
PARTS LIST PARTS LIST- BAFFLES, DOOR, OPTIONS 1) 3) 4) 5) 6) 7) 9) 16) 17) 19) 69) 70) 71) 72) 73) 74) 75) 76) 77) 78) 79) 80) 81) Part # 000-920 846-911 846-917 846-300 936-243 846-920 * 948-174/P 846-973 846-570 846-918 948-101 836-171 * * 902-108 902-107 902-106 902-112 902-113 836-132 836-133 836-131 000-955 000-954 Description Masonry Retainer Kit (Optional) Door Assembly- Gold Door Assembly- Black Glass - Replacement 7/8" Adhesive Tape Glass Retainer Clips (set of 8) Screw 1/4-20 x 3/8" Glass Retai
WARRANTY Regency Fireplace Products are designed with reliability and simplicity in mind. In addition, our internal Quality Assurance Team carefully inspects each unit thoroughly before it leaves our door. Regency Industries Ltd. is pleased to extend this limited lifetime warranty to the original purchaser of a Regency Product. This warranty is not transferable.
Regency fireplace products are designed with reliability and simplicity in mind. In addition, our internal Quality Assurance Team carefully inspects each unit thoroughly before it leaves our door. Fireplace Products International Ltd. is pleased to extend this Limited Lifetime Warranty to the original purchaser of a Regency Product. See the inside back cover for details. Register your Regency online at http://www.regency-fire.