WOOD Fireplace Insert www.regency-fire.com Owners & Installation Manual MODELS: Tested by: 918-171a I2400M Installer: Please complete the details on the back cover and leave this manual with the homeowner. Homeowner: Please keep these instructions for future reference. FPI FIREPLACE PRODUCTS INTERNATIONAL LTD. 6988 Venture St.
Thank-you for purchasing a REGENCY FIREPLACE PRODUCT. The pride of workmanship that goes into each of our products will give you years of trouble-free enjoyment. Should you have any questions about your product that are not covered in this manual, please contact the REGENCY DEALER in your area. Keep those REGENCY FIRES burning. SAFETY NOTE: If this Insert is not properly installed, a house fire may result.
TABLE OF CONTENTS THE REGENCY I2400 WOOD INSERT SAFETY LABEL OPERATING INSTRUCTIONS Safety Label .................................................................4 Some Safety Guidelines ..............................................13 Wood Storage..............................................................14 Ash Disposal ...............................................................14 Fan Operation ............................................................14 Creosote ..............................
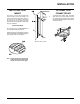
A) B) C) D) 11 in / 280 mm 20 in / 508 mm 12 in / 305 mm 8 in / 200 mm INSTALL ONLY ON A NON-COMBUSTIBLE HEARTH RAISED (F) 0.5IN / 13MM ABOVE AN ADJACENT COMBUSTIBLE FLOOR. COMBUSTIBLE FLOOR MUST BE PROTECTED BY NONCOMBUSTIBLE MATERIAL EXTENDING (E) 18 IN / 457 MM TO FRONT AND (G) 8 IN / 205 MM TO SIDES FROM FUEL DOOR. 0.5" FLOOR PROTECTION NEEDS TO BE WITH k=0.84. COMPONENTS REQUIRED FOR INSTALLATION: 6IN / 150MM STAINLESS STEEL LINER.
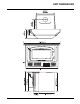
UNIT DIMENSIONS Regency I2400M 5
INSTALLATION Regency Inserts are constructed with the highest quality materials and assembled under strict quality control procedures that insure years of trouble free and reliable performance. It is important that you read this manual thoroughly and fully understand the safe installation and operating procedures. The more you understand the way your Regency Insert operates, the more enjoyment you will experience from knowing that your unit is operating at peak performance.
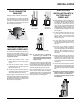
INSTALLATION INSTALLING YOUR INSERT OPTIONAL FLUE CONNECTOR KIT Your insert is very heavy and will require two or three people to move it into position. The insert can be made a little lighter by removing the cast iron door by opening it and lifting it off its hinges. Be sure to protect your hearth extension with a heavy blanket or carpet scrap during the installation.
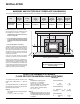
INSTALLATION MASONRY AND FACTORY BUILT FIREPLACE CLEARANCES The minimum required clearances to combustible materials when installed into a masonry or factory built fireplace are listed below. Unit Adjacent Side Wall (to Side) A Medium Flush Insert (I2400) 11"/280mm Mantle** (to Top) B 20"/508mm Top Facing (to Top) C Side Facing (to Side) D Minimum Hearth Extension* E 12"/305mm 8"/200mm 18"/455mm Minimum Hearth Thickness* F 0.
INSTALLATION STEP-BY-STEP INSTALLATION INTO A FACTORY BUILT FIREPLACE FLUE CONNECTOR BRACKET Package contains: 3 brackets and 6 screws. These brackets are to be used to hold the flue liner (not supplied) to the Insert and keep the connection. The brackets are screwed into the top of the Insert in the pre-punched holes and then screwed into the flue liner.
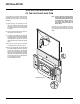
INSTALLATION STEP-BY-STEP INSTALLATION OF THE FACEPLATE AND TRIM Note: It may be easier to install the insulation, faceplate top and faceplate trim with the unit pulled slightly away from the fireplace face. If this is done, be very careful not to disturb the connector when shifting the unit to its final position.
INSTALLATION STEP-BY-STEP INSTALLATION OF THE FAN/BLOWER Your fan should only be installed once the unit is in place in order to prevent any damage to the fan. To attach, follow the instructions provided with the fan. Make sure to install the rubber grommet to the fan housing before it is installed on the insert. 1) Remove the protective covering from the brass trim on the fan. 2) Align the fan support with the offset clip on the bottom of the ashlip.
INSTALLATION FLOOR PROTECTION Please check to ensure that your floor protection and hearth will meet the standards for clearance to combustibles. Your hearth extension must be made from a non-combustible material. ensure the tube will not move when the unit is burning. Though there are four air tubes in the medium units. 2) Slide the left baffle over the air tubes from the front and then push it to the back.
OPERATING INSTRUCTIONS SOME SAFETY GUIDELINES 1) Never use gasoline, gasoline type lantern fuels, kerosene, charcoal lighter fuel, or similar liquids to start or ‘freshen up’ a fire in your heater. Keep all such liquids well away from the heater while it is in use. 2) Keep the door closed during operation and maintain all seals in good condition. 3) Do not burn large quantities of paper in your insert. 4) If you have smoke detectors, prevent smoke spillage as this may set off a false alarm.
OPERATING INSTRUCTIONS 9) During the first few hours it may be more difficult to start the fire. As you dry out your fire brick and your masonry flue (if applicable), your draft will increase. 10) For those units installed at higher elevations or into sub-standard masonry fireplaces, drafting problems may occur. Consult an experienced dealer or mason on methods of increasing your draft. 11) Some cracking and popping noises may be experienced during the heating up process.
MAINTENANCE MAINTENANCE OF GOLD-PLATED DOORS The gold electroplated finish on the doors requires little maintenance, and need only be cleaned with a damp cloth. DO NOT use abrasive materials or chemical cleaners, as they may harm the finish and void the warranty. GLASS CLEANING Only clean your glass window when it is cool. Your local retailer can supply you with special glass cleaner if plain water and a soft cloth does not remove all deposits.
PARTS LIST MAIN ASSEMBLY & OPTIONS - I2400M Part # 1) 2) 4) 5) 6) 7) 9) 846-910 Door Assy - Large Gold (no glass) 846-916 Door Assy - Large Blk (no glass) 846-304 Glass - Replacement 936-243 7/8" Adhesive Tape Gasket 846-920 Glass Retainer Clips (8/set) * Screw 1/4-20 x 3/8" 948-172/P Glass Retainer - Large 846-973 Door Handle Assembly 16) 846-570 17) 846-918 19) 948-101 20) 948-102 23) 846-235 16 Description Door Gasket Kit Hinge Caps - Gold Plated (2/set) Spring Handle - Large Spring Handle - Small
PARTS LIST FACEPLATES - I2400M Part # Description 140-911 Faceplate & Trim Set Regular Trim Right Regular Trim Top Regular Trim Left Regular Faceplate Side Regular Faceplate Top Regular 285) 143-161 286) 143-158 287) 143-160 288) * 289) * 140-913 295) 143-164 296) 143-162 297) 143-163 298) * 299) * Faceplate & Trim Set Oversize Trim Right Oversize Trim Top Oversize Trim Left Oversize Faceplate Side Oversize Faceplate Top Oversize *Not available as a replacement part.
PARTS LIST BRICK PANELS - I2400M Part # 70) 902-111 75) 802-122 76) 802-152 18 Description Brick Regular Full Size: 1-1/4" x 4-1/2" x 9" Brick Partial: 1-1/4 x 4-1/2" x 2" Brick Partial: 1-1/4" x 2" x 9" Regency I2400M
WARRANTY Regency Fireplace Products are designed with reliability and simplicity in mind. In addition, our internal Quality Assurance Team carefully inspects each unit thoroughly before it leaves our door. Regency Industries Ltd. is pleased to extend this limited lifetime warranty to the original purchaser of a Regency Product. This warranty is not transferable.
Regency fireplace products are designed with reliability and simplicity in mind. In addition, our internal Quality Assurance Team carefully inspects each unit thoroughly before it leaves our door. Fireplace Products International Ltd. is pleased to extend this Limited Lifetime Warranty to the original purchaser of a Regency Product. See the inside back cover for details. Register your Regency online at http://www.regency-fire.