
Owner`s manual


INSTALLING THE FAN CONTINUED
ELECTRICAL CONNECTIONS
WARNING:
WARNING:
To avoid damaging the blade arms and blades,
do not install them onto fan until fan is fastened to ceiling.
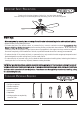
1. Lift ball/downrod/fan into hanging bracket opening.
NOTE:
NOTE:
The tab opposite hanging bracket opening should fit
in slot on ball.
*
Be sure electricity is turned off at the main power box
before wiring.
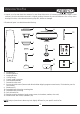
1. Four wires are connected to the fan.
Black - this is the "hot" power to run fan.
White - this is the "common" power to run fan and light.
Blue - this is the "hot" power for light kit.
Green - ground wire (on bracket or downrod).
2. If fan and light are to be connected to the same circuit,
black and blue wires can both be connected to house
circuit black wire.
NOTE:
NOTE:
The other end of the blue wire, (light circuit) is in
the switch housing with a wire nut and label for light kit
attachment. The white wire (common for light kit) is also
there.
WARNING:
WARNING:
If light kit is not used, DO NOT connect blue
wire at the ceiling.
Slot
Tab
Fig. 1
Fig. 3
Fig. 2
7