
Owner`s manual


5
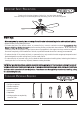
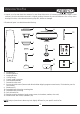
INSTALLING THE MOUNTING BRACKET AND HANGING BRACKET
Fig. 1
Flat
washers
Hanger
bracket
Spring
washers
Hex nuts
Mounting
bracket
Caution:
Caution:
To avoid possible electrical shock, be sure electricity
is turned off at the main power box before wiring. All wiring
must be in accordance with National and Local Electrical
Codes and the ceiling fan must be grounded as a precaution
against possible electric shock.
IMPORTANT NOTE:
IMPORTANT NOTE:
THIS CEILING FAN EXCEEDS THE
MAXIMUM WEIGHT (35 LBS) SPECIFIED BY UL FOR
HANGING FROM A STANDARD CEILING FAN RATED
OUTLET BOX. SPECIAL REINFORCEMENT TO THE
CEILING IS REQUIRED FOR INSTALLATION!
CAUTION:
CAUTION:
Wood screws must go through the outlet box and
directly into the building joist or into added cross support.
(Fig. 1)
Step 1. Remove the two knock-outs from the outlet box to
expose the joist. If the outlet box does not have knock-outs,
you will need to drill the holes. (Fig. 1)
Step 2. Secure the mounting bracket directly to the joist from
the building via the knock out holes from the outlet box.
Secure the mounting bracket with the wood screws and lock-
washers provided with the fan. (Fig. 1)
Step 3. Secure the hanger bracket to mounting bracket
using the two hex nuts and washers provided, make sure
nuts are securely tighten. (Fig. 2)
WARNING:
WARNING:
Do not over-tighten the hex nut on the heavy
duty hanging plate - properly tighten it until it is secured.
Over-tightening the hex nut will result in the breakage of
the bolt.
Fig. 1
Knock out
Flat washers
Wood screws
Lock washers
Outlet
box
Mounting
bracket