t ReflexFlash USER GUIDE 1.0 High-speed USB duplication made easy.
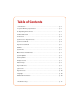
Table of Contents I. Introduction ………………………………….……….…............................ p. 2 II. System Memory Specification ………………………………….……….... p. 2 III. Operating Environment ………………………………….……………….. p. 2 IV. Menu Overview ………………………………….………………………… p. 3 V. Functions ………………………………….……………………………….... p. 4 Synchronous v. Asynchronous ………………………………….……….…... p. 4 Synchronous Mode ………………………………….……………………….. p. 4 Asynchronous Mode ………………………………….………………..…….. p. 5 USBInfo ………………………………….……………………………….......... p.
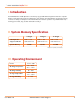
t ReflexFlash I. Introduction The ReflexFlash line of USB duplicators conveniently copy portable USB storage drives without a computer. Thanks to their advanced asynchronous duplication, each channel can independently load, unload, and copy, so there’s no waiting or interruption. This manual will assist in the basic operation of your Reflex Flash unit, showing you how fast, easy, accurate and intuitive it really is. II.
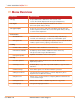
t ReflexFlash IV. Menu Overview Function Description 1. Copy Copies USB Cards or USB Drives. All contents of the source drive will be duplicated to all target card(s)/drive(s) 2. Compare Performs a bit-for-bit comparison between the source drive and copied card(s) / drive(s) 3. Copy+Compare Copies the source drive, and then immediately follows with a bitfor-bit comparison between the source and copied card(s) / drive(s) to ensure exact duplication 4. Information 4.
t ReflexFlash V. Functions 1. Copy/Compare/Copy+Compare The Reflex USB Duplicator can autoatically detect and support two different copy modes: Synchronous Asynchronous After the system is powered on and the source drive is inserted, scroll to Copy, Compare, or Copy+Compare and press the ENT key. The system will start to scan the source to check the content size. If the source content is less than the system’s memory, then the system will automatically select and start Asynchronous copying.
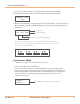
t ReflexFlash 3. Scroll to select Copy, Compare, or Copy+Compare from menu and press ENT. 4. Insert target drive(s). The LCD will show the number of target drive(s) inserted. USB(963M) 450M 3 ready 5. After the desired number of target drive(s) are inserted, press ENT to execute the function. Or when all writer trays are loaded with target drive(s), the system will automatically start the function.
t ReflexFlash 4. The duplicator will immediately begin executing the function as each target drive is inserted. Pass: 0 Fail: 0 Working 3 Start copying as each target drive is inserted 5. During the process, each slot’s green LED will blink continuously. CAUTION: Do NOT take out the drive while the system is busy. Once the process is completed, the green LED light will become steady.
t ReflexFlash Utility 1. Quick Erase (Menu Function 5.1) only erases the index FAT table of each drive, while Full Erase (Menu Function 5.2) will erase the entire content of the USB Drive. Note: Either of the Erase Functions will clear the FAT table in the SD USB Drive, making the device unreadable on computers until it is re-formatted. 2. System Update (Menu Function 5.3): This is to update the system’s firmware version.
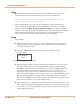
t ReflexFlash 3. Button Beep (Menu Function 6.3) n This option will allow the user to turn on or off the audio signal when a button is pressed. Press the UP and DOWN buttons to switch between ON and OFF. Press ENT to select and exit. [Button Beep] ON 4. Asyn Hold time (Menu Function 6.4) n This option allows the user to set the time the system waits when all writer trays are unloaded before exiting the asynchronous mode. The default is set to 30 seconds.
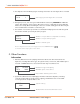
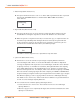
t ReflexFlash Example: Source 1GB Target 2GB FAT FAT Copy OK n If a source device has a bigger capacity than target devices: 1. Set the tolerance % higher or set to “Don’t care” (no limit). 2. Data stored on flash devices such as USB cards and USB drives are located randomly instead of sequentially. The success of this type of duplication depends on the data size as well as the data location on the source device.
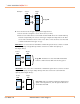
t ReflexFlash Illustration 3 For source device with FAT16 or FAT32 file system whose content is located content size is bigger than the capacity of the target drive(s) : Source 2GB Target 1GB Copy Fails. Data size is bigger than the capacity of the target device. Insufficient memory space to complete the copy process. 6. Asynchronous (Menu Function 6.6) n User may select to turn on or off the Asynchronous copy mode.
t ReflexFlash • Do NOT remove any drive that has blinking green light When a drive is in a process, the green LED light located above the writer tray will be flashing. Never remove any drive with blinking green LED light. This may very likely damage the drive itself, cause data loss, or damage the system hardware circuit.
t ReflexFlash 5. Red LED light turns on a. Press UP and DOWN buttons to check each drive for error messages. b. If error message “Not FAT format” is displayed, the file system on the source drive is not of the FAT format. Exit current job and select the “Analyze Source” function from the menu and set it to OFF. c. If error message “Not correct size” is displayed, the capacity difference between source and target drive is larger than the tolerance setting.