
User manual


9
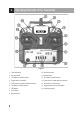
10. Setting up the Transmitter
In the further course of these instructions, gures in the text always refer to the adjacent gure or the gures
within the section. References to other gures are indicated with the corresponding gure number.
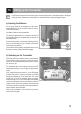
a) Inserting the Batteries
For the power supply of the transmitter you will need 4
alkaline batteries (e.g. item no. 652507, pack of 4, order 1)
of the size AA/mignon.
Proceed as follows to insert the batteries:
The battery compartment lid (1) is located on the back of
the transmitter. Press the corrugated area (2) and push off
the lid downwards.
Ensure that the polarity is correct when inserting the 4 bat-
teries. A corresponding note (3) is located on the bottom
of the battery compartment.
Then slide the lid of the battery compartment back on from
the bottom until the locking mechanism engages.
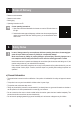
b) Switching on the Transmitter
When new batteries are inserted, switch on the transmitter
with the function switch (see gure 1, item 8) for test pur-
poses. For this, slide the operating switch from the bottom
(off) to the top (on).
The transmitter emits a short signal sound and the LED
display (also see gure 1, item 7) lights up green perma-
nently.
If the voltage supply drops below 5.0 V, the LED display
switches from green to orange to red and thus indicates
threatening undersupply of the transmitter. The model
should then no longer be operated. When the voltage
drops below approx. 4.0 V, the LED display starts ashing
red and the transmitter emits acoustic warning sounds at
regular intervals. In this case, operation of the model must
be ceased as quickly as possible. Insert new batteries for
further operation of the transmitter.
After you have veried the correct function of your trans-
mitter, switch it off again.
Figure 2
Figure 3