
Product Manual


Reelcraft Industries, Inc. • (800) 444-3134 / (260) 248-8188 • Fax: (260) 248-2605
reelcraft@reelcraft.com • www.reelcraft.com
3
Installing the Output Hose
WARNING: Use extreme caution; reel under tension. Avoid releasing latch mechanism.
CAUTION: Apply pipe thread sealant to all threads on standard reels. Do not overtighten connection. Recommended torque not to exceed
70 ft. lb.
1. Manually turn sheave until spring is tight, back off 2 turns, then latch.
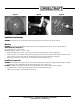
2. Route output hose through roller bracket, U-bolts, then through cut out in spool as indicated in above illustrations.
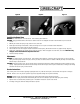
3. Connect output hose to swivel output as indicated in Figure E.
4. Place U-bolt over hose and through the slotted holes below the hose opening. Add washers and lock nuts, tighten securely. (Figure F)
5. Charge hose. Momentarily open control valve to purge hose of gases. When fluid appears at control valve, close valve. With hose fully
charged, release latch and wind output hose onto reel.
6. Install hose bumper assembly.
Adjustments
WARNING: Use extreme caution; reel under tension. Avoid releasing latch mechanism. If necessary, adjust spring tension on reel by manually
adding or removing wraps of hose from spool, one wrap at a time, until desired tension is obtained. Manually add wraps to increase tension.
Remove wraps to decrease tension.
CAUTION: When adding wraps of hose, add just enough wraps to achieve the desired tension without exceeding the winding mechanism’s spring
capacity. Properly tensioned reels allow all hose to be freely removed from the spool until the point of U-bolt contact. Damage to the winding
mechanism will result if spring is over-tensioned.
Service Instructions
User servicing of the reel is limited to replacing input/output hoses only. Refer all other repairs to an authorized service person or directly to
Reelcraft. Failure to do so may result in personal injury and/or equipment damage and may void the warranty.
WARNING: Rewind hose on reel, then bleed pressure from system before performing the following procedures.
CAUTION: Remove all spring tension before disassembling the hose reel. Do not attempt to open the riveted spring case assembly.
1. Replace hoses in accordance with procedures given in "Installation Instructions" section of this manual.
2. All mating moving parts have been factory lubricated as required.
Figure D
Figure E Figure F