
Product Manual

Reelcraft Industries, Inc. • (800) 444-3134 / (260) 248-8188 • Fax: (260) 248-2605
reelcraft@reelcraft.com • www.reelcraft.com
2
Installation Instructions
WARNING: Ensure that reel, hose, and equipment are properly grounded. Use an ohmmeter to check ground continuity.
Mounting
CAUTION: Unless reel was specified differently when ordering, maximum installation height is 16 feet. Do not exceed this distance.
Maximum Operating Temperature:
Low pressure (300 p.s.i.) = 150°F (66°C)
Medium/High pressure (2000 p.s.i.) = 210°F (99°C)
1. Unpack and inspect reel for damage. Turn spool by hand to check for smooth operation. Check for completeness.
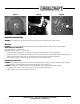
2. Configure reel for top, side or bottom hose dispensing by removing bolts from one side of the guide roller bracket and loosening the four
guide arm bolts on each side of the hose reel. Remove each guide arm then reinstall in the desired configuration.
3. Position reel on floor, wall, or ceiling. Secure into place using four (customer supplied) bolts.
Installing the Input Hose
WARNING: Ensure that supply line pressure does not exceed maximum working pressure rating of reel. Apply pipe thread sealant to all threads
on standard reels. Do not overtighten connection. Recommended torque not to exceed 70 ft. lb.
CAUTION: Use flexible hose connection at input. Do not use rigid plumbing. The use of rigid plumbing may void warranty.
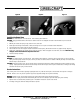
1. Apply thread sealant as shown in Figure B and connect input hose to main shaft input Figure C.
2. Tighten securely, ensuring a sealed connection has been made.
Figure A Figure B Figure C