R2320 Infrared Thermometer Instruction Manual REED Instruments 1-877-849-2127 | info@reedinstruments.com | www.reedinstruments.
Table of Contents Introduction.................................................................................................... 3 Product Quality............................................................................................... 3 Safety............................................................................................................. 3 Features.......................................................................................................... 4 Included.......................
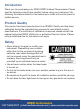
Introduction Thank you for purchasing your REED R2320 Infrared Thermometer. Please read the following instructions carefully before using your instrument. By following the steps outlined in this manual your meter will provide years of reliable service. Product Quality This product has been manufactured in an ISO9001 facility and has been calibrated during the manufacturing process to meet stated product specifications.
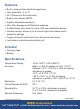
Features • • • • • • • • Built-in laser pointer identifies target area User selectable °F or °C 30:1 Distance to Spot size ratio Bright color display (EBTN) Digitally adjustable emissivity Max, Min, Average and Differential readings Audible (beep) and visual (tri-color LED) user adjustable alarms Internal memory stores up to 5 pre-set high & low alarms and 5 emissivity settings • Trigger lock and tripod mount for continuous monitoring • Low battery indication and auto shut off Included • Carrying Case • B
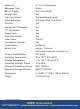
Emissivity: Response Time: Backlit Display: Display Hold: High/Low Alarms: Alarm Indicators: Max/Min: Average and Differential: F/C Switchable: Trigger Lock: Tripod Mountable: Laser Class: Low Battery Indicator: Power Supply: Battery Life: Product Certifications: Operating Temperature: Storage Temperature: Operating Humidity Range: Maximum Operating Altitude: Maximum Storage Altitude: Dimensions: Weight: 0.1 to 1.
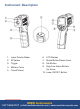
Instrument Description R2320 2.5@60 D:S=30:1 / -32~800°C @36 1.2 -26~1472°F 0.9@12 l siona eter Profesd Thermom S.com Infrare RUMENT 24@300 30@900 62@1500 EDINST RE www. 1. 2. 3. 4. 5. Laser Pointer Beam IR Sensor Trigger Battery Cover Tripod Mount 6. 7. 8. 9. LCD Display Mode Button/Down Arrow Set Button High/Low Alarm Button/ Up Arrow 10. Laser ON/OFF Button REED Instruments 6 1-877-849-2127 | info@reedinstruments.com | www.reedinstruments.
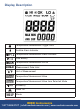
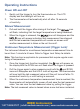
Display Description Temperature Measurement Trigger Lock Audible Alarm Indicator K Temperature Measurement Alarm Indicator Low Battery Temperature Measurement Active Measurement Data Hold Unit of Measurement Temperature Measurement Value Temperature Measurement Value from Selected Mode Emissivity Laser On Mode REED Instruments 7 1-877-849-2127 | info@reedinstruments.com | www.reedinstruments.
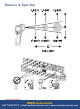
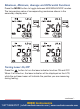
Distance & Spot Size 4 REED Instruments 8 1-877-849-2127 | info@reedinstruments.com | www.reedinstruments.
Operating Instructions Power ON and OFF 1. 2. Gently pull the trigger to turn the thermometer on. The LCD display and the backlight will turn on. The thermometer will automatically shut off after 15 seconds of inactivity. Manual Measurement 1. 2. Pull and hold the trigger after aiming at the target. The icon will flash, indicating that the target temperature is being measured.
Maximum, Minimum, Average and Differential Functions Press the MODE button to toggle between MAX/MIN/AVG/DIF modes. The temperature value of corresponding modes are shown in the secondary display area. Turning Laser On/Off Press the button to turn the laser indicator function ON and OFF. When it is turned on, the laser indicator will be displayed on the LCD, while the red laser beam will indicate the position you are measuring during testing. continued...
Setting the High Temperature Alarm Press the SET button once to enter the high alarm limit setup. Press button to toggle between alarm preset values as indicated by the P1-P5. Use the UP or DOWN buttons to set the temperature value within selected the preset. Press the UP or DOWN buttons to add or subtract by 1 temperature value. Hold the UP or DOWN buttons to add or subtract by 10 temperature values. The instrument will exit the setup after 10 seconds of inactivity or if the trigger is pulled at any time.
Adjusting Emissivity The instrument's emissivity can be adjusted from 0.01 to 1.0 to meet the type of surface being measured. Refer to the Emissivity Chart for reference. Press the SET button three times to enter the emissivity setup. Press button to toggle between emissivity preset values as indicated by the P1-P5. Use the UP and DOWN buttons to set the emissivity values. Press the UP and DOWN buttons to add or subtract 0.01 unit and/or hold the UP and DOWN buttons to add or subtract 0.1.
Audible Alarm Setting Press the SET button five times and the audible alarm indicator will appear on the display. Press the UP or DOWN buttons to turn the audible alarm On/Off. The instrument will exit the setup after 10 seconds of inactivity or if the trigger is pulled at any time. Trigger Lock Setup Press the SET button six times and the temperature measurement trigger will appear on the display. Press the UP or DOWN lock indicator buttons to turn the trigger lock setup on/off.
When both the low and high alarm limits are turned on as indicated by HI/LO on the display, the green LED will turn on and "OK" will appear on the display, indicating that the measured temperature value is normal. When the "HI/LO" limit alarm function is turned on and the measured temperature value is within the high and low alarm limit range, the green LED lights up and the OK indicator is displayed, indicating that the measured temperature value is normal. 1. 2. 3. 4. 3 High/Low alarms on.
Battery Replacement 1. 2. 3. 4. The battery should be replaced when Open the battery cover. Replace the 9V battery. Close the battery cover. D:S=30:1 -26~1472°F / -32~800°C 0.9@12 1.2@36 24@300 30@900 is displayed. 2.
Appendix: Emissivity Chart Emissivity is a term used to describe the energy-emitting characteristics of materials. Most (90% of typical applications) organic materials and painted or oxidized surfaces have an emissivity of 0.95. Inaccurate readings will result from measuring shiny or polished metal surfaces. To compensate, cover the surface to be measured with masking tape or flat black paint. Allow time for the tape to reach the same temperature as the material underneath it.
Measured Surfaces Emissivity Steel: Cold Rolling, Steel PlateBurnishing, Steel Plate Rubbing 0.7-0.9, 0.4-0.6, 0.1 Zinc: Oxidization 0.1 Non-Metal Asbestos 0.95 Asphalt 0.95 Basalt 0.7 Carbon: Non-Oxidization, Graphite, Silicone Carbide 0.8-0.9, 0.7-0.8, 0.9 Ceramics 0.95 Clay 0.95 Concrete 0.95 Cloth 0.9 Glass: Convex, Smooth, Lead-Boron 0.76-0.8, 0.92-0.94, 0.78-0.82 Plates 0.96 Stone Products 0.93 Plaster 0.8-0.95 Ice 0.98 Limestone 0.98 Paper 0.95 Plastics 0.
Fault Diagnostics Symptom Problem Action "OL" appears on display when measuring Measured value is greater than the maximum range Stop measuring "-OL" appears on display when measuring Measured value is Stop measuring less than the minimum range Err appears when booting Exceeding the minimum or maximum operating ambient temperature Place the thermometer in a 0°C to 50°C(32°F to 122°F) environment and resume operation after 30 minutes Low battery indicator flashes Low battery Replace the battery
Product Warranty REED Instruments guarantees this instrument to be free of defects in material or workmanship for a period of one (1) year from date of shipment. During the warranty period, REED Instruments will repair or replace, at no charge, products or parts of a product that proves to be defective because of improper material or workmanship, under normal use and maintenance. REED Instruments total liability is limited to repair or replacement of the product.
Test & Measure with Confidence Check out our latest Products! REED Instruments 1-877-849-2127 | info@reedinstruments.com | www.reedinstruments.