LM-81LX Light Meter Instruction Manual REED Instruments 1-877-849-2127 | info@reedinstruments.com | www.reedinstruments.
Table of Contents Introduction.................................................................................................... 2 Product Quality............................................................................................... 2 Safety............................................................................................................. 3 Features.......................................................................................................... 3 Included.......................
Safety Never attempt to repair or modify your instrument. Dismantling your product, other than for the purpose of replacing batteries, may cause damage that will not be covered under the manufacturer's warranty. Servicing should only be provided by an authorized service center.
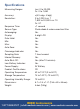
Specifications Measuring Ranges: Accuracy: Resolution: Response Time: Sensor Type: Autoranging: Display: Data Hold: Min: Max: Auto Zero: Overrange Indicator: Sampling Rate: Internal Memory: Auto Shut-Off: Low Battery Indicator: Power Supply: Product Certifications: Operating Temperature: Storage Temperature: Operating Humidity Range: Dimensions: Weight: Lux: 0 to 20,000 Fc: 0 to 1,860 ±(5% rdg.+ 8 dgt) 0 to 2,200 Lux: 1 1,800 to 20,000 Lux: 10 Fc: 0.
Instrument Description 5 6 7 8 9 3 LM-81LX 4 1. Lux/Ft-cd Button 2. MAX/MIN Button 3. LCD Display 4. Wrist Strap 5. Light Sensor 6. Battery Compartment/Cover 7. Zero Button 8. Power Button 9. Hold Button REED Instruments 5 1-877-849-2127 | info@reedinstruments.com | www.reedinstruments.
Operating Instructions 1. 2. 3. 4. Turn the instrument on or off by pressing the POWER button. Press the Lux/Ft-cd button to toggle between Lux and Foot Candles units of measurement. When selected, face the Light Sensor under the light source. When the readings are stable, note the measured value. Data Hold 1. 2. 3. While taking a measurement, press the HOLD button to freeze the current readings on the display. While in this mode a "HOLD" symbol will appear on the LCD.
Battery Replacement When the low battery icon appears on the left corner of LCD display, you will need to replace the batteries. Remove the battery cover using a Phillips head screwdriver, insert a new 9V battery and secure the cover. Accessories and Replacement Parts CA-52A Soft Carrying Case Don't see your part listed here? For a complete list of all accessories and replacement parts visit your product page on www.reedinstruments.com.
Product Warranty REED Instruments guarantees this instrument to be free of defects in material or workmanship for a period of one (1) year from date of shipment. During the warranty period, REED Instruments will repair or replace, at no charge, products or parts of a product that proves to be defective because of improper material or workmanship, under normal use and maintenance. REED Instruments total liability is limited to repair or replacement of the product.
TEST & MEASURE WITH CONFIDENCE CHECK OUT OUR LATEST PRODUCTS! REED Instruments 1-877-849-2127 | info@reedinstruments.com | www.reedinstruments.
REED Instruments 1-877-849-2127 | info@reedinstruments.com | www.reedinstruments.