USER'S MANUAL Model No. RBEX49840 Serial No. Serial Number Decal QUESTIONS? As a manufacturer, we are committed to providing complete customer satisfaction. If you have questions, or if there are missing parts, we will guarantee complete satisfaction through direct assistance from our factory. TO AVOID DELAYS, PLEASE CALL DIRECT TO OUR TOLLFREE CUSTOMER HOT LINE. The trained technicians on our customer hot line will provide immediate assistance, free of charge to you.
TABLE OF CONTENTS IMPORTANT PRECAUTIONS . . . . . . . . . . . . . . . . . . . . . . . . . . . . . . . . . . . . . . . . . . . . . . . . . . . . . . . . . . . . . . . .2 BEFORE YOU BEGIN . . . . . . . . . . . . . . . . . . . . . . . . . . . . . . . . . . . . . . . . . . . . . . . . . . . . . . . . . . . . . . . . . . . . . .3 ASSEMBLY . . . . . . . . . . . . . . . . . . . . . . . . . . . . . . . . . . . . . . . . . . . . . . . . . . . . . . . . . . . . . . . . . . . . . . . . . . . . . . .
BEFORE YOU BEGIN Service Department toll-free at 1-877-994-4999, Monday through Friday, 6 a.m. until 6 p.m. Mountain Time (excluding holidays). To help us assist you, please mention the product model number and serial number when calling. The model number is RBEX49840. The serial number can be found on a decal attached to the exercise cycle (see the front cover of this manual for the location of the decal). Congratulations for selecting the new REEBOK® RT 245 exercise cycle.
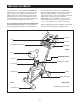
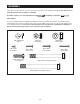
ASSEMBLY Place all parts of the exercise cycle in a cleared area and remove the packing materials. Do not dispose of the packing materials until assembly is completed. Assembly requires your own adjustable wrench and phillips screwdriver . PART CHART Use the part drawings below to identify the small parts used in assembly. The number in parenthesis below each drawing refers to the key number of the part, from the PART LIST on page 22. The second number refers to the quantity used in assembly.
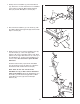
1. Identify the Front Stabilizer (2), which has Wheels (17) attached to one side. Attach the Front Stabilizer to the Frame (1) with two M10 x 92mm Carriage Bolts (62) and two M10 Nylon Locknuts (48). 1 17 2 62 1 2. Attach the Rear Stabilizer (3) to the Frame (1) with two M10 x 105mm Carriage Bolts (64) and two M10 Nylon Locknuts (48). 48 2 48 3 48 1 64 3. While another person holds the Handlebar Post (6) near the Frame (1), connect the Upper Wire Harness (16) to the Lower Wire Harness (24).
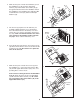
4. While another person holds the Handlebar (7) near the Handlebar Post (6), feed the Upper Wire Harness (16) and the Pulse Sensor Wire (45) up through the indicated hole in the Handlebar. Attach the Handlebar to the Handlebar Post with three M8 x 25mm Button Screws (19) and three M8 Split Washers (28). 4 Hole 45 7 6 28 16 19 28 19 5. The Console (9) requires four “D” batteries (not included); alkaline batteries are recommended. Press the indicated tab on the battery cover and remove the cover.
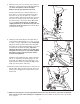
8. Attach the Seat (12) to the Seat Post (11) with four M8 Nylon Locknuts (56) and four M8 Split Washers (28). Note: The Nylon Locknuts and Split Washers may be pre-attached to the Seat. 8 12 Turn the Seat Knob (31) counterclockwise two or three turns to loosen it. Next, pull the Knob, insert the Seat Post (11) into the Frame (1), and then release the Knob. Slide the Round Collar (13) down the Seat Post and press it into the Frame. Attach the Round Collar to the Frame with an M6 x 8mm Screw (26).
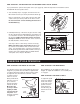
HOW TO INSTALL THE RECEIVER FOR THE OPTIONAL CHEST PULSE SENSOR If you purchase the optional chest pulse sensor (see page 19), follow the steps below to install the receiver included with the chest pulse sensor. 1. See assembly step 5 on page 6, and remove the two M4 x 25mm Screws (not shown) and the Bookrack (8). 1 8 9 Next, look under the console and locate the three indicated screws (not shown). Remove the three screws. Do not remove the screws attaching the Console to the Handlebar (7). 7 Screws 2.
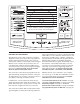
Note: If there is a sheet of clear plastic on the face of the console, remove the plastic. FEATURES OF THE CONSOLE The advanced console offers a selection of features designed to make your workouts more enjoyable and effective. When the manual mode of the console is selected, the resistance of the pedals can be changed with the touch of a button. As you exercise, the console will provide continuous exercise feedback. You can even measure your heart rate using the handgrip pulse sensor.
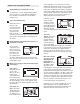
your pedaling pace, in revolutions per minute (RPM). The display will change from one number to the next every few seconds, as shown by the indicators in the display. Note: When a program is selected, the display will show the time remaining in the program instead of the elapsed time. Each time the resistance of the pedals changes, the display will show the resistance level. HOW TO USE THE MANUAL MODE 1 Begin pedaling to activate the console. To activate the console, begin pedaling.
5 Note: If you continue to hold the pulse sensor, the lower display will show your heart rate for up to 30 seconds. The display will then show your heart rate along with the other modes. Measure your heart rate if desired. You can measure your heart rate using either the handgrip pulse sensor or the optional chest pulse sensor. Note: If you hold the handgrip pulse sensor and wear the chest pulse sensor at the same time, the console will not display your heart rate accurately.
The program will continue until the resistance setting for the last segment is shown in the Current Segment column of the matrix and no time remains in the program. HOW TO USE PRESET PROGRAMS 1 Begin pedaling to activate the console. Note: During the program, you can override the resistance setting for the current segment by pressing the Resistance buttons.
3 HOW TO USE HEART RATE PROGRAMS When heart rate program 1 is selected, you must enter your age. If you have already entered your age, press the Enter (Program Start) button and go to step 5. If you have not entered your age, press the + or – button repeatedly to enter your age, and then press the Enter button. Note: Once you have entered your age, it will be saved in memory.
6 Begin pedaling. The pace guide will help you to maintain a constant pace during the program. When one of the indicators on the left side of the pace guide lights, increase your pace; when one of the indicators on the right side lights, decrease your pace. When the center indicator lights, maintain your current pace. Important: The pace settings of the program are intended only to provide a goal. Make sure to pedal at a pace that is comfortable for you.
HOW TO CONNECT YOUR PORTABLE STEREO HOW TO CONNECT YOUR CD PLAYER, VCR, OR COMPUTER Note: If your stereo has an RCA-type AUDIO OUT jack, see instruction A below. If your stereo has a 1/8” LINE OUT jack, see instruction B. If your stereo has only a PHONES jack, see instruction C. To use iFIT.com CDs, the exercise cycle must be connected to your portable CD player, portable stereo, home stereo, or computer with CD player. See pages 15 and 16 for connecting instructions. To use iFIT.
HOW TO CONNECT YOUR HOME STEREO HOW TO CONNECT YOUR COMPUTER Note: If your stereo has an unused LINE OUT jack, see instruction A below. If the LINE OUT jack is being used, see instruction B. Note: If your computer has a 1/8” LINE OUT jack, see instruction A. If your computer has only a PHONES jack, see instruction B. A. Plug one end of the audio cable into the jack beneath the console. Plug the other end of the cable into the adapter. Plug the adapter into the LINE OUT jack on your stereo. A.
HOW TO CONNECT YOUR VCR B. Plug one end of the audio cable into the jack beneath the console. Plug the other end of the cable into the adapter. Plug the adapter into an RCA Y-adapter (available at electronics stores). Next, remove the wire that is currently plugged into the AUDIO OUT jack on your VCR and plug the wire into the unused side of the Y-adapter. Plug the Y-adapter into the AUDIO OUT jack on your VCR. Note: If your VCR has an unused AUDIO OUT jack, see instruction A below.
your workout. Simply follow your personal trainer’s instructions. HOW TO USE IFIT.COM CD AND VIDEO PROGRAMS The program will function in almost the same way as a preset program (see steps 3 and 4 on page 12). However, an electronic “chirping” sound will alert you when the resistance of the pedals and/or the target pace is about to change. To use iFIT.com CDs or videocassettes, the exercise cycle must be connected to your portable CD player, portable stereo, home stereo, computer with CD player, or VCR.
7 HOW TO USE PROGRAMS DIRECTLY FROM OUR WEB SITE When the on-screen countdown ends, the program will begin. The program will function in almost the same way as a preset program (see steps 3 and 4 on page 12). However, an electronic “chirping” sound will alert you when the resistance of the pedals and/or the target pace is about to change. Our Web site at www.iFIT.com allows you to play iFIT.com programs directly from the internet.
MAINTENANCE AND TROUBLESHOOTING Inspect and properly tighten all parts of the exercise cycle regularly. The exercise cycle can be cleaned with a soft, damp cloth. To prevent damage to the console, keep liquids away from the console and keep the console out of direct sunlight. Right Side Shield. Using an adjustable wrench, turn the Right Pedal (37) counterclockwise and remove it.
EXERCISE GUIDELINES Fat Burning WARNING: To burn fat effectively, you must exercise at a relatively low intensity level for a sustained period of time. During the first few minutes of exercise, your body uses easily accessible carbohydrate calories for energy. Only after the first few minutes of exercise does your body begin to use stored fat calories for energy.
PART LIST—MODEL NO. RBEX49840 Key No. Qty. 1 2 3 4 5 6 7 8 9 10 11 12 13 14 15 16 17 18 19 20 21 22 23 24 25 26 27 28 29 30 31 32 33 34 35 36 1 1 1 1 1 1 1 1 1 2 1 1 2 2 2 1 2 1 7 2 15 1 1 1 2 2 2 11 2 5 1 1 1 1 2 2 Description Key No. Qty.
EXPLODED DRAWING—MODEL NO.
ORDERING REPLACEMENT PARTS To order replacement parts, call our Customer Service Department toll-free at 1-877-994-4999, Monday through Friday, 6 a.m. until 6 p.m. Mountain Time (excluding holidays).