
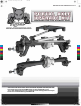
RER11289 Redcat Portal Axle Kit Instructions

Redcat Racing
07
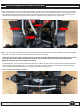
Once you’ve installed the bottoms of the shocks, you can flip the vehicle back over to its correct orientation.
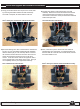
Your vehicle should now look like this:
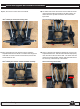
Now it’s time to install the shock mounts. Let’s start with
the rear end this time.
If you are using the tilt rear body mount, you can remove
the rear body post mount from in between the original
shock towers. Now, using 3pcs each of the 3x10mm BH
Screws and M3 Lock Nuts, install each shock mount as
shown below. Once the mounts are installed, go ahead
and mount the top of the shocks.
Note: If you’d like to keep the rear body post mount, you
will just thread the screws directly into the mount instead of
using the lock nuts where the mount is lined up with the
screws positions shown.
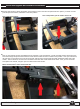
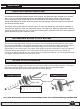
This is the location of the shock now. Note the
positions of each screw and lock nut:
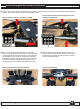
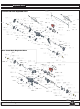
Now, we can install the front shock mounts. The forward
two screws on each side will go through the shock mounts,
frame rails, and thread directly into the body post mount.
The rear screws will need lock nuts to thread into after
passing through the shock mounts and frame rails.
You can see the positions in the picture below:
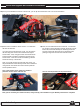
Now you can reinstall your wheels and tires, and your body. The installation of your Redcat portal axles is complete!
16)
17)
18)
Redcat Racing
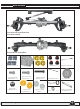
01
Installation Instructions
Redcat Racing
08
Portal Axle Upgrade Kit Installation Instructions