
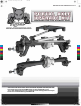
RER11289 Redcat Portal Axle Kit Instructions

Redcat Racing
03
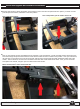
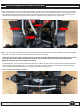
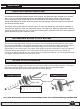
The next step will be to change the position of the bumper mount to clear the new portal axle servo plate. If you haven’t moved
your bumper mount before, it should be in the stock position.
This is the stock location:
This is the position you will need to move it to:
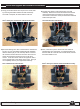
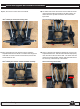
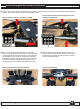
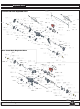
Now, we can start the process of installing the front portal axle. First and foremost, you will most likely need to feed some more
servo wire through the zip ties toward the front of the vehicle to allow the servo to reach its new position. Once you’ve done that,
the next step is to secure the servo into the servo plate, with the servo facing forward and down toward the bottom side of the
vehicle. Just for reference, the servo horn should be on the same side of the chassis as the motor. Now, you can mount the
servo plate to the chassis, using the 4pcs of 3x10mm button head screws.
When finished, here’s what it should look like:
5)
6)
Installation Instructions
Redcat Racing
01
Installation Instructions
Redcat Racing
04
Portal Axle Upgrade Kit Installation Instructions