
RER11289 Redcat Portal Axle Kit Instructions

Redcat Racing
02
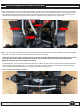
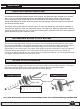
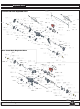
The first step will be to start removing the front axle
assembly. Remove the screws and nuts that secure the
upper and lower links and shocks to the axle housing.
You’ll need to remove the screw pin that secures the drive
shaft to the input shaft.
The end result will look like this:
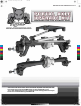
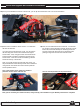
Using your stock Everest Gen 7 Sport or Pro model, start
by removing the wheels and tires as well as the body.
Once that is complete, we’ll start with the front end.
Here’s what your current front end should look like:
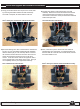
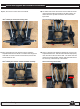
Since the steering servo wire is secured to the chassis with
zip ties, you can’t completely separate the axle assembly
from the vehicle just yet. The next step will be to remove
the screw that secures the servo link to the servo horn as
well as the screws that secure the servo to the servo
mounts. You’ll also need to remove the upper link that is
on the opposite side of the vehicle as the motor. Now you
can completely remove your original axle assembly.
This is what that should look like:
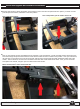
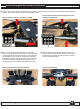
Next, unbolt the top of the shocks from the chassis to
separate them from the vehicle. Go ahead and also pop
the lower ball out of the rod ends on both shocks, and set
the shocks aside for now.
Here’s what your chassis should resemble currently:
1)
2)
3)
4)
Redcat Racing
01
Portal Axle Upgrade Kit Installation Instructions
Redcat Racing
03