
User Manual
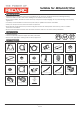


Step 7
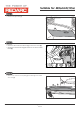
Step 9
Suitable for: Mitsubishi Triton
FI11705
Issue: 4 Date: 14/08/2018
Kit Part No: TPWKIT-003
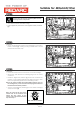
Step 8
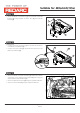
• Remove the fastener (1) from the passenger side front kick
panel (2).
• Remove the kick panel (2) from the vehicle.
1
2
1
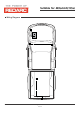
Page 07 of
• Locate the vehicle 3-way connector (1).
The following step is for vehicles with a 3-way connector already
mated and occupied.
• Disconnect the 3-way connectors.
• Remove the foam tape from the 3-way male connector.
• Using a jewellers flat head screw driver, disengage the 3-way
connectors secondary lock (4) by releasing the clips (5) on
either side and sliding the secondary lock back.
• House the blue wire into the mating connector (2) on the kick
panel harness (3) as indicated below.
• Re-engage the 3-way connector secondary lock before
joining the connectors back and wrap using the supplied Foam
Tape.
Proceed to Step 10.
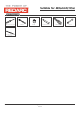
1
Rear of Connector
Terminal No. Colour
1 BLUE
2 OCCUPIED
3
OCCUPIED
2
3
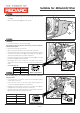
The following step is for vehicles without a 3-way connector
already mated.
• If a connector is not present, then use the supplied mating
3-Way Male Connector.
• House the blue wire on the kick panel harness (1) in the
connector following orientation shown below.
• Engage the 3-Way Male Connector secondary lock (3) by
pushing firmly towards the front of the connector.
• Connect the 3-way male connector to the vehicle connector
(2) and wrap using the supplied Foam Tape.
Rear of Connector
Terminal No. Colour
1 BLUE
2 -
3
2
1
-
1
3
1
3
5
5
4
3
12
© 2018