
Product Manual


3
INSTALLATION
Step 1
• Separate the supporting brackets by moving the parts back and forth until the
small connecting tags break.
Note: All component parts of the bracket kit are attached to each other during
manufacturing and transit. Before installing the bracket you need to separate
the components by breaking the small connecting tags between the parts.
No tools are required.
Step 2
• Design a layout for your bracket using as many of the bracket parts as needed.
Once you are happy with the layout you have devised, attach all the required
bracket parts together using the M6x12 Pan Head Bolts and M6 Nylon Locking nuts.
Notes:
• The charger can be oriented in either a horizontal or vertical position.
• All the bracket components can be configured in any way to secure the
assembly in place. You can also bend or shape the components to create
alternate angles for more mounting options.
• In some situations you may decide to assemble the bracket parts
progressively as the unit is installed in its final location.
Step 3
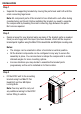
• Fit the BCDC unit to the mounting
bracket using four M6x12 Pan
Head Bolt and four M6 Nylon
Locking Nuts.
Note: You may want to carry out
any additional wiring for the BCDC
before fitting to vehicle.