
Operation Manual


COPYRIGHT © 2015 RED.COM, INC
RED DSMC OPERATION GUIDE: WEAPON
955-0116_V6.1, REV-E | 84
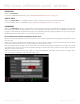
STORAGE
You can select the following storage locations:
Local: Stores footage directly to an SSD
Network: Stores footage to a network
External: Stores footage to an external device
NOTE: In External storage, you can only select Continuous Record and Motion + Stills recording modes.
CONTINUOUS RECORD
NOTE: This mode is not available in Stills mode.
Continuous Record is the “normal” recording mode. The camera continuously records frames at the current
recording frame rate. You can limit each recording to a specific amount of frames using the Limit Recording to
setting.
INTERNAL TIMELAPSE TIMER
NOTE: This mode is not available in Stills mode.
In Internal Timelapse Timer mode, the camera records a specified number of frames at a specified interval. The
current recording frame rate determines the timing of the frames per pulse.
For example, in Internal Timelapse Timer mode, you can choose to record a total amount of 1000 frames, and
take 1 frame every 4.67 seconds. After recording 1000 frames (which takes 4,670.00 seconds), the recording
process stops.
To use Internal Timelapse Timer mode, follow the instructions below:
1. Go to Menu > Settings > Recording > Mode.
2. Select Internal Timelapse Timer from the Mode drop-down menu.
3. Use the Limit Recording to fields to set the recording to end at a predefined frame limit (optional).
4. Select the number of frames to be captured in the Record field.
5. Select the time interval from the Interval field (range is 1–3,599 sec). The Interval setting specifies the
frequency at which the frame or group of frames is captured.
6. Close the menu.
7. Start recording to start the interval.
The overlay displays the number of frames recorded out of the total amount of frames.
FRAME TRIGGER
NOTE: This mode is not available in Stills mode.
In Frame Trigger mode, the camera records the specified number of frames for each external trigger. This mode
limits the REDCODE based on sustainable record rates.
To use Frame Trigger mode, follow the instructions below:
1. Go to Menu > Settings > Recording > Mode.
2. Select Frame Trigger from the Mode drop-down menu.
3. Use the Limit Recording to fields to set the recording to end at a predefined frame limit (optional).
4. Select a Pre Count and Post Count. For more information, go to “Pre Count and Post Count” on page 86.
5. Close the menu.
6. Start recording.
The overlay displays the number of frames recorded out of the total amount of frames.
NOTE: There may be a delay between receiving the external trigger and capturing the next frame(s). The delay
may be as long one (1) frame period at the current recording frame rate. To completely synchronize frames to
an external trigger, set Sensor Sync Mode to MoCo. For more information, go to “Sync” on page 99.