
Operation Manual


COPYRIGHT © 2015 RED.COM, INC
RED DSMC OPERATION GUIDE: WEAPON
955-0116_V6.1, REV-E | 140
Your RED
®
DSMC
®
functionality may be upgraded by installing the latest firmware. Make a habit of frequently
visiting www.red.com/downloads to check for new versions of camera firmware, updated operation guides, and
post production software.
VERIFY CURRENT CAMERA FIRMWARE
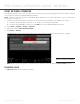
To see the firmware version that is currently installed on your DSMC, go to Menu > Settings > Maintenance >
System Status > Camera Info. A higher number reflects a later release.
UPGRADE CAMERA FIRMWARE
Install the most recent firmware. Unless otherwise specified in the online release notes, you do not need to
upgrade to any firmware in between your current version and the most recent version available online.
NOTE: You must black shade a WEAPON
®
after upgrading it.
NOTE: Upgrading your camera deletes all in-camera user-generated Preset, Look, and Custom Overlay files.
1. If you have user-generated preset files on your camera, follow the instructions below to save the files to an
SSD:
A. Turn on the camera, insert an SSD (RED MINI-MAG
®
) into the camera, and format the SSD.
B. Go to Menu > Presets and copy user-generated Camera Preset and Look files to the SSD.
C. Go to Menu > Settings > Display > Monitor Control and copy user-generated Overlay files to the SSD.
D. Turn off the camera, and remove the SSD. You will copy the files back to your camera after the upgrade
procedure, as described in Step 14.
2. Connect an SSD (RED MINI-MAG) to your computer.
NOTE: On Mac
®
computers with REDCINE-X PRO
®
installed, RED Watchdog mounts the SSD as Read-Only
by default, which means that you are unable to write files (including firmware upgrade files) to the SSD.
Change the Mount preference to Read-Write before attempting to copy firmware to the SSD.
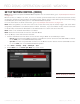
3. Download WEAPON firmware from www.red.com/downloads.
4. Unzip the firmware zip file.
5. Copy the force_upgrade folder and its contents to the top level of the SSD directory.
6. Eject or unmount the SSD, and then remove the SSD.
7. Ensure the BRAIN is turned off.
8. Insert the SSD with the force_upgrade folder into your DSMC.
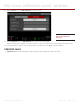
9. Turn on the BRAIN.
The upgrade runs automatically.
During upgrade, the fans run at high speed and the PWR and REC LEDs flash green. After approximately
15 seconds, the LEDs stop flashing and the camera turns off. Nothing displays on the external monitors
during the upgrade.
10. After the BRAIN turns off, remove the SSD and wait 10 seconds.
08
UPGRADE DSMC
FIRMWARE