
Operation Manual


RED DSMC OPERATION GUIDE: WEAPON
COPYRIGHT © 2015 RED.COM, INC 955-0116_V6.1, REV-E | 105
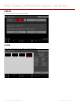
CALIBRATION MANAGEMENT
Use the Calibration Management menu to apply, import, and export calibration maps.
Calibration Map: The calibration maps that are saved internally on the camera:
‒ Factory: This is the calibration map generated during the manufacturing process, and is the default
map.
‒ User HS: The user-created calibration map.
Media: The calibration maps that are on the SSD in the path shown (for example, S-SSD\calibration).
CALIBRATION MAP ACTIONS
Set: Apply the selected camera calibration map.
Delete: Delete the selected camera calibration map. You cannot delete the factory map.
Apply: Apply the selected calibration map from the SSD temporarily (without importing to the camera).
EXPORT AND IMPORT CALIBRATION MAPS
NOTE: The camera cannot export calibration maps created by Auto Capture.
Calibration maps can be stored on the camera or transferred to SSD to be shared with other cameras. You can
also build a library of calibration maps to use in different settings.
: Export selected calibration map from camera to SSD.
: Import selected calibration map from SSD to camera. This overwrites the user HS calibration map.
GYROSCOPE AND ACCELEROMETER CALIBRATION
The internal three-axis gyroscope and three-axis accelerometer need to be calibrated for the Horizon overlay
to function properly. The Gyro/Acc calibration file is stored in the flash memory of the BRAIN, so you DO NOT
need to recalibrate after restoring the camera or upgrading firmware. For more information, go to “Horizon” on
page 60.
To calibrate the Horizon overlay, follow the instructions below:
1. Turn on the BRAIN and place it on a level surface.
2. Wait for the camera core temperature to reach room temperature.
3. Go to Menu > Settings > Maintenance > Calibration > Gyro/Acc and select Low Temperature Calibration.
4. After the calibration finishes, wait for the camera core temperature to reach maximum operating temperature.
5. When the BRAIN reaches maximum operating temperature, select High Temperature Calibration.
LENS CALIBRATION
There are many electronic lenses that are compatible with the DSMC Canon Mount or DSMC Nikon Mount, but
are not electronically supported by the DSMC. The Lens Calibration feature allows you to create custom lens
configuration files for these electronic lenses so that you can use rack focus and autofocus.
A custom configuration file might not make an unsupported lens as precise as a fully supported lens. However,
a custom configuration file provides the aperture range and focal lengths so that you can electronically control
the lens with the camera.
NOTE: The camera may not be able to calibrate some electronic lenses.
NOTE: The camera does not create calibration files for lenses that are already electronically supported. For a full
list of supported lenses, go to “Lens Mounts and Lenses” on page 171.
CREATE LENS CALIBRATION FILES
The calibration process creates a calibration file for the current focal length of the electronic lens. Calibrate the
lens at each available focal length to create a full lens calibration file.
1. Attach a DSMC Canon Mount or DSMC Nikon Mount to the BRAIN.
2. Attach an electronic lens.