
Operation Manual
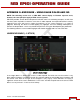
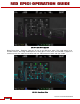
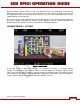
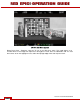
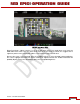
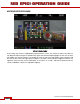
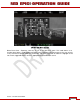
Table Of Contents
- RED EPIC® OPERATION GUIDE
- TABLE OF CONTENTS
- DISCLAIMER
- COMPLIANCE
- BEFORE YOU START
- THEORY OF OPERATION
- CAMERA OPERATIONAL CONTROLS
- BASIC OPERATION
- FIRST TIME USE – SETTING UP YOUR RED EPIC
- MENU CONTROLS
- MAIN MENU
- SECONDARY MENUS
- APPENDIX A: UPGRADING CAMERA FIRMWARE
- APPENDIX B: MANAGING DIGITAL MEDIA
- APPENDIX C: CHARGING BATTERIES
- APPENDIX D: INPUT / OUTPUT CONNECTORS
- APPENDIX E: REDMOTE OPERATION
- APPENDIX F: 3D SETUP / OPERATION
- APPENDIX G: EXPOSURE – USING FALSE COLOR AND ISO
- APPENDIX H: POST PRODUCTION
- APPENDIX I: TROUBLESHOOTING
- APPENDIX J: MAINTENANCE
- APPENDIX K: TECHNICAL DATA
- APPENDIX L: MENU MAPS
Version 1.4.0 SVN 29352 BETA
©2011 RED.COM INC. APRIL 19, 2011
140 140
POWER UP / DOWN
Located on the upper right side of the REDmote is the Power / Lock Switch (refer to CONTROLS).
POWER UP
CONNECTED TO CAMERA
If the REDmote is physically attached to a camera, when the camera is powered UP the REDmote will
automatically power UP along with the camera.
NOT CONNECTED TO CAMERA
To manually power UP the REDmote, depress and hold the Power / Lock Switch in the Down direction
for 2 seconds then release,
POWER DOWN
CONNECTED TO CAMERA
If the REDmote is physically attached to a camera and the camera is powered DOWN, the REDmote will
automatically power DOWN.
NOTE: If the power cable is disconnected from the camera or the AC plug, the REDmote will
remain powered up and should be manually powered down using the Power / Lock Switch.
NOT CONNECTED TO CAMERA
To manually power DOWN the REDmote:
Press and hold the Power / Lock Switch in the Down direction for 2 seconds then release.
RECORDING
IMPORTANT: Before recording from a REDmote ensure the camera is properly powered, set up
and media is connected. Refer to BASIC OPERATION.
To record, press the Red REC (record) button on the REDmote.
x If media is connected and properly formatted, the upper LED will illuminate Red and a Red dot will
appear to the immediate left of the Timecode display on the REDmote LCD display.
x If media is NOT connected, the REDmote LCD display will display “ERROR ON CAMERA A –
DIGITAL MEDIA NONE ATTACHED”. The camera LCD and external displays will indicate “DIGITAL
MEDIA NONE ATTACHED” (shown).
To stop recording, press one of the record buttons a second time.