
Operation Manual
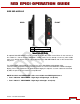

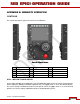
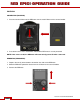
Table Of Contents
- RED EPIC® OPERATION GUIDE
- TABLE OF CONTENTS
- DISCLAIMER
- COMPLIANCE
- BEFORE YOU START
- THEORY OF OPERATION
- CAMERA OPERATIONAL CONTROLS
- BASIC OPERATION
- FIRST TIME USE – SETTING UP YOUR RED EPIC
- MENU CONTROLS
- MAIN MENU
- SECONDARY MENUS
- APPENDIX A: UPGRADING CAMERA FIRMWARE
- APPENDIX B: MANAGING DIGITAL MEDIA
- APPENDIX C: CHARGING BATTERIES
- APPENDIX D: INPUT / OUTPUT CONNECTORS
- APPENDIX E: REDMOTE OPERATION
- APPENDIX F: 3D SETUP / OPERATION
- APPENDIX G: EXPOSURE – USING FALSE COLOR AND ISO
- APPENDIX H: POST PRODUCTION
- APPENDIX I: TROUBLESHOOTING
- APPENDIX J: MAINTENANCE
- APPENDIX K: TECHNICAL DATA
- APPENDIX L: MENU MAPS

Version 1.4.0 SVN 29352 BETA
©2011 RED.COM INC. APRIL 19, 2011
136 136
x Soft Menu Key 6 – Undefined.
x Soft Menu Key 7 – Undefined.
x Soft Menu Key 8 – Undefined.
AMBIENT LIGHT SENSOR
On the upper right side of the REDmote is an ambient light sensor (L) which is used to automatically
adjust the brightness of the LCD display.
POWER / LOCK SWITCH
Below the ambient light sensor is the Power / Lock switch (T).
Sliding and holding in the switch in the POWER direction for longer than 2 seconds will Power UP or
Power DOWN the REDmote.
Moving the switch to the LOCK position will lockout all REDmote buttons to prevent unintentional
operation. When in the LOCK position, a padlock icon will be displayed in the REDmote LCD display.
USB POWER PORT
On the lower right side is a USB port that may be used to charge the REDmote internal battery. Refer to
CHARGING / BATTERY LIFE > CHARGING USING USB CONNECTOR for complete information.
CHARGING / BATTERY LIFE
CHARGING USING CAMERA
While connected to the camera, the REDmote will automatically recharge its internal battery. Charge
status is indicated by the Green Battery Icon at the top-right of the REDmote LCD display screen. A fully
discharged REDmote battery will be re-charged in approximately 8 hours if connected to a powered
camera. A much faster charge time may be achieved with a USB based power source such as laptop
P.C.
CHARGING USING USB CONNECTOR
The REDmote can be charged by connecting a Mini-USB-to-USB cable between REDmote and a
computer or a cell phone charger.
NOTE: The REDmote can be charged using the Mini-USB connector while connected and
controlling a camera wirelessly.
1. Connect the USB connector to any computer (computer must be ON to charge REDmote).
2. Connect the Mini-USB end to the REDmote USB Port located on the lower right side (under rubber
protective cover).