
User Manual
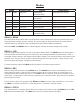


Table Of Contents

16
Control Voltage
Control voltage input is configured the same way as an expression pedal.
CV Range: 0-3.3V (with over/under-voltage protection)
Tip: 0-3.3V input
Ring: 3.3V output (with current limiting)
Sleeve: ground
The expression input has current limiting in case you use a TS cable, but it is preferable to use a 1/4”
TRS cable with the ring unconnected. We sell a suitable cable at our web site, and the Expert Sleep-
ers ‘floating ring’ cable is another option. Instructions for building your own cable are available on our
Knowledge Base.
Tap Tempo
Uses a normally open momentary switch. Configure it using the web editor.
TRS MIDI
Select MIDI (TRS) in the web editor to use the control port as a MIDI input. This is a non-standard MIDI
interface, because there is no optocoupler on the input, but it is used by many guitar pedals. You will
need a converter or a MIDI controller with 1/4" TRS outputs, which are available from Empress Eects,
Disaster Area Designs, and others. Those devices contain an optocoupler to prevent current loops.
Remote Switch
A remote switch has up to 4 modes of 4 switches that can access presets and pedal functions. It works
with our remote switches, some third-party switches, and is DIY friendly for dierent control interfac-
es. See our Knowledge Base for infomation on building a compatible switch. Note that the switch uses
parallel resistors, and switches with shorting contacts will not work without an adapter (most tap-tempo
switches and the Roland FS-6, for example).
1, 2, 3, and 4-button switches are supported. The modes and functions accessible will depend on the
number of buttons. A single-button switch can load or save your favorite sound. To save a preset, hold
the corresponding button for two seconds. The right LED will blink green to indicate that the preset has
been stored.
Configuring a Remote Switch:
1. Start with the pedal powered on and nothing plugged into the CTRL port.
2. Hold the right footswitch while plugging in the remote switch. The right LED will blink yellow 3 times
to indicate it is in CTRL configuration mode. You can release the right footswitch and begin configu-
ration immediately.
3. Press one of the buttons on the remote switch to select a mode.
4. Hold the right footswitch for 2 seconds to save the configuration. The right LED will blink green to
indicate that the configuration has been saved.
The selected mode is remembered when power is turned o, and does not change when loading a pre-
set.