
User Guide
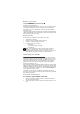
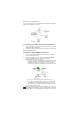
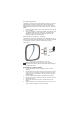
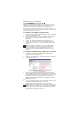
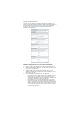
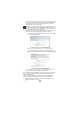
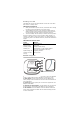
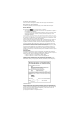
Table Of Contents
- Before you start
- Installing the 950AP
- Corporate installations
- Star-wire installations
- Home installation
- Connecting power
- Mounting to a wall (or ceiling)
- Figure 3 : Mounting the 950AP to a wall or ceiling
- 1. Use the mounting bracket as a template to mark out drill positions.
- 2. Drill two holes 43 mm apart using a 5.5 mm drill bit. The holes must be 75 mm from where the c...
- 3. Insert suitable fastenings such as wall plugs into the holes.
- 4. Position the mounting bracket over the two holes and insert the appropriate screws.
- 5. Connect the cables from the hole in the wall/ceiling to the 950AP.
- 6. Slide the 950AP over the mounting bracket until it fits into the groove. Continue sliding unti...
- Configuring the 950AP
- 1. Make a note of the 950AP’s Bluetooth address, which is displayed on a label underneath the unit.
- 2. Perform a device discovery on your Bluetooth-enabled PDA or laptop. Refer to your device’s doc...
- 3. Look for the 950AP’s Bluetooth address and connect to it.
- 4. Launch your web browser and enter the 950AP’s default IP address ‘http://192.168.1.1’. The Ini...
- 1. Visit www.red-m.com and to download the Red-M Setup application from the support area.
- 2. Install and run Red-M Setup. This finds the 950AP’s IP address and provides a link to it.
- 3. Look for your 950AP’s Bluetooth address in the list of access points displayed by Red-M Setup....
- 4. Click on the 950AP’s address. Your web browser window opens and displays the 950AP management ...
- 5. Complete the Initial Configuration process (see below).
- Initial Configuration
- Figure 5 : Initial Configuration screen
- 1. Enter a name for the 950AP if you want to easily recognize it.
- 2. Enter an administrator password (16 characters maximum) and then confirm the password.
- 3. Enable/disable Network Address Translation (NAT) for the 950AP. By default NAT is enabled. Cle...
- 4. Select the WAN port (Network port) configuration:
- 5. Select a security level for your 950AP. If you select Secure, the unit will be discoverable, b...
- 6. Page 2 of the Initial Configuration depends on your selection in step 4. If you selected DHCP,...
- 7. Click OK to complete the 950AP’s configuration.
- 1. Enter a name for the 950AP if you want to easily recognize it.
- 2. Enter an administrator password (16 characters maximum) and then confirm the password.
- 3. Ensure Network Address Translation (NAT) for the 950AP is selected. By default NAT is enabled.
- 4. Select the WAN port (Network port) configuration:
- 5. Select a security level for your 950AP. If you select Secure, the unit will be discoverable, b...
- 6. Page 2 of the Initial Configuration depends on your selection in step 4. If you selected DHCP,...
- 7. Click OK to complete the 950AP’s configuration.
- Reading the LED
- 950AP Diagram
- Contact information
- Regulatory information
- The following regulatory statements apply to the 950AP LAN access point.
- By attaching themark to this product, we confirm:
- To conform with FCC rules regarding RF exposure, this equipment should be installed a minimum of ...
- Any changes or modifications not expressly approved by the manufacturer could void the user’s aut...
- This device has been designed to operate with an antenna that has a maximum gain of 0 dB. Antenna...
- To reduce potential radio interference to other users, the antenna type and its gain should be so...
- To prevent radio interference to the licensed service in Canada, this device is intended to be op...
- This product is designed to connect to "Bluetooth" compatible radio interfaces using the 2.4 GHz ...
- [Member States of the EEA are: Austria, Belgium, Denmark, Finland, France, Germany, Greece, Icela...
- Trademarks
- Power supply information

Configuring the 950AP
950APs are configured and managed via a web browser. Up to 32
users and 32 devices can be configured to connect securely to the
950AP, with up to seven devices connecting simultaneously.
Once you have installed the 950AP, you can begin the short
configuration process. You can complete the setup over Bluetooth
or using an Ethernet connection.
To configure the 950AP using Bluetooth:
1. Make a note of the 950AP’s Bluetooth address, which is displayed
on a label underneath the unit.
2. Perform a device discovery on your Bluetooth-enabled PDA or
laptop. Refer to your device’s documentation for more
information.
3. Look for the 950AP’s Bluetooth address and connect to it.
4. Launch your web browser and enter the 950AP’s default IP
address ‘http://192.168.1.1’. The Initial Configuration screen
appears.
To configure a 950AP using an Ethernet connection:
1. Visit www.red-m.com and to download the Red-M Setup
application from the support area.
2. Install and run Red-M Setup. This finds the 950AP’s IP address
and provides a link to it.
Figure 4: Red-M Setup screen
3. Look for your 950AP’s Bluetooth address in the list of access
points displayed by Red-M Setup. A new 950AP has a red tick by
its name while previously configured 950APs have a green tick.
An 950AP’s name will be in the format: 950AP-xxxxxxxxx.
4. Click on the 950AP’s address. Your web browser window opens
and displays the 950AP management interface.
5. Complete the Initial Configuration process (see below).
Note: Your 950AP is supplied to you in initial configuration
mode. This means you can only initially connect a Bluetooth
device to complete the Initial Configuration. Once this is
completed, you can set up Bluetooth connectivity for other
devices.
Hint: The 950AP’s Bluetooth address is displayed on a label
underneath the unit.
Note: By default, the 950AP uses a DHCP server to obtain an IP
address. If there is no DHCP server on your LAN or the 950AP
cannot find one, you must configure the 950AP using Bluetooth
and the default IP address, 192.168.1.1.