
User Guide
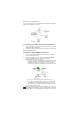
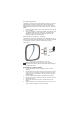
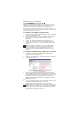
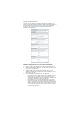
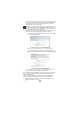
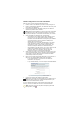

Table Of Contents
- Before you start
- Installing the 950AP
- Corporate installations
- Star-wire installations
- Home installation
- Connecting power
- Mounting to a wall (or ceiling)
- Figure 3 : Mounting the 950AP to a wall or ceiling
- 1. Use the mounting bracket as a template to mark out drill positions.
- 2. Drill two holes 43 mm apart using a 5.5 mm drill bit. The holes must be 75 mm from where the c...
- 3. Insert suitable fastenings such as wall plugs into the holes.
- 4. Position the mounting bracket over the two holes and insert the appropriate screws.
- 5. Connect the cables from the hole in the wall/ceiling to the 950AP.
- 6. Slide the 950AP over the mounting bracket until it fits into the groove. Continue sliding unti...
- Configuring the 950AP
- 1. Make a note of the 950AP’s Bluetooth address, which is displayed on a label underneath the unit.
- 2. Perform a device discovery on your Bluetooth-enabled PDA or laptop. Refer to your device’s doc...
- 3. Look for the 950AP’s Bluetooth address and connect to it.
- 4. Launch your web browser and enter the 950AP’s default IP address ‘http://192.168.1.1’. The Ini...
- 1. Visit www.red-m.com and to download the Red-M Setup application from the support area.
- 2. Install and run Red-M Setup. This finds the 950AP’s IP address and provides a link to it.
- 3. Look for your 950AP’s Bluetooth address in the list of access points displayed by Red-M Setup....
- 4. Click on the 950AP’s address. Your web browser window opens and displays the 950AP management ...
- 5. Complete the Initial Configuration process (see below).
- Initial Configuration
- Figure 5 : Initial Configuration screen
- 1. Enter a name for the 950AP if you want to easily recognize it.
- 2. Enter an administrator password (16 characters maximum) and then confirm the password.
- 3. Enable/disable Network Address Translation (NAT) for the 950AP. By default NAT is enabled. Cle...
- 4. Select the WAN port (Network port) configuration:
- 5. Select a security level for your 950AP. If you select Secure, the unit will be discoverable, b...
- 6. Page 2 of the Initial Configuration depends on your selection in step 4. If you selected DHCP,...
- 7. Click OK to complete the 950AP’s configuration.
- 1. Enter a name for the 950AP if you want to easily recognize it.
- 2. Enter an administrator password (16 characters maximum) and then confirm the password.
- 3. Ensure Network Address Translation (NAT) for the 950AP is selected. By default NAT is enabled.
- 4. Select the WAN port (Network port) configuration:
- 5. Select a security level for your 950AP. If you select Secure, the unit will be discoverable, b...
- 6. Page 2 of the Initial Configuration depends on your selection in step 4. If you selected DHCP,...
- 7. Click OK to complete the 950AP’s configuration.
- Reading the LED
- 950AP Diagram
- Contact information
- Regulatory information
- The following regulatory statements apply to the 950AP LAN access point.
- By attaching themark to this product, we confirm:
- To conform with FCC rules regarding RF exposure, this equipment should be installed a minimum of ...
- Any changes or modifications not expressly approved by the manufacturer could void the user’s aut...
- This device has been designed to operate with an antenna that has a maximum gain of 0 dB. Antenna...
- To reduce potential radio interference to other users, the antenna type and its gain should be so...
- To prevent radio interference to the licensed service in Canada, this device is intended to be op...
- This product is designed to connect to "Bluetooth" compatible radio interfaces using the 2.4 GHz ...
- [Member States of the EEA are: Austria, Belgium, Denmark, Finland, France, Germany, Greece, Icela...
- Trademarks
- Power supply information