
User Guide
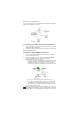
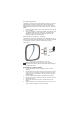
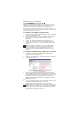
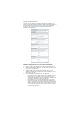
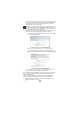
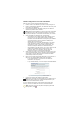
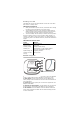
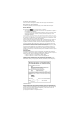
Table Of Contents
- Before you start
- Installing the 950AP
- Corporate installations
- Star-wire installations
- Home installation
- Connecting power
- Mounting to a wall (or ceiling)
- Figure 3 : Mounting the 950AP to a wall or ceiling
- 1. Use the mounting bracket as a template to mark out drill positions.
- 2. Drill two holes 43 mm apart using a 5.5 mm drill bit. The holes must be 75 mm from where the c...
- 3. Insert suitable fastenings such as wall plugs into the holes.
- 4. Position the mounting bracket over the two holes and insert the appropriate screws.
- 5. Connect the cables from the hole in the wall/ceiling to the 950AP.
- 6. Slide the 950AP over the mounting bracket until it fits into the groove. Continue sliding unti...
- Configuring the 950AP
- 1. Make a note of the 950AP’s Bluetooth address, which is displayed on a label underneath the unit.
- 2. Perform a device discovery on your Bluetooth-enabled PDA or laptop. Refer to your device’s doc...
- 3. Look for the 950AP’s Bluetooth address and connect to it.
- 4. Launch your web browser and enter the 950AP’s default IP address ‘http://192.168.1.1’. The Ini...
- 1. Visit www.red-m.com and to download the Red-M Setup application from the support area.
- 2. Install and run Red-M Setup. This finds the 950AP’s IP address and provides a link to it.
- 3. Look for your 950AP’s Bluetooth address in the list of access points displayed by Red-M Setup....
- 4. Click on the 950AP’s address. Your web browser window opens and displays the 950AP management ...
- 5. Complete the Initial Configuration process (see below).
- Initial Configuration
- Figure 5 : Initial Configuration screen
- 1. Enter a name for the 950AP if you want to easily recognize it.
- 2. Enter an administrator password (16 characters maximum) and then confirm the password.
- 3. Enable/disable Network Address Translation (NAT) for the 950AP. By default NAT is enabled. Cle...
- 4. Select the WAN port (Network port) configuration:
- 5. Select a security level for your 950AP. If you select Secure, the unit will be discoverable, b...
- 6. Page 2 of the Initial Configuration depends on your selection in step 4. If you selected DHCP,...
- 7. Click OK to complete the 950AP’s configuration.
- 1. Enter a name for the 950AP if you want to easily recognize it.
- 2. Enter an administrator password (16 characters maximum) and then confirm the password.
- 3. Ensure Network Address Translation (NAT) for the 950AP is selected. By default NAT is enabled.
- 4. Select the WAN port (Network port) configuration:
- 5. Select a security level for your 950AP. If you select Secure, the unit will be discoverable, b...
- 6. Page 2 of the Initial Configuration depends on your selection in step 4. If you selected DHCP,...
- 7. Click OK to complete the 950AP’s configuration.
- Reading the LED
- 950AP Diagram
- Contact information
- Regulatory information
- The following regulatory statements apply to the 950AP LAN access point.
- By attaching themark to this product, we confirm:
- To conform with FCC rules regarding RF exposure, this equipment should be installed a minimum of ...
- Any changes or modifications not expressly approved by the manufacturer could void the user’s aut...
- This device has been designed to operate with an antenna that has a maximum gain of 0 dB. Antenna...
- To reduce potential radio interference to other users, the antenna type and its gain should be so...
- To prevent radio interference to the licensed service in Canada, this device is intended to be op...
- This product is designed to connect to "Bluetooth" compatible radio interfaces using the 2.4 GHz ...
- [Member States of the EEA are: Austria, Belgium, Denmark, Finland, France, Germany, Greece, Icela...
- Trademarks
- Power supply information

Power supply information
English
CAUTION: Only use this product with a power source that meets the "Limited Power Source"
requirements of IEC 60950 or equivalent safety standards. Use the power supply provided (if
applicable) or contact Red-M for a list of suitable power sources.
Dansk
ADVARSEL: Dette produkt må kun anvendes sammen med strømkilder, der opfylder kravene
vedrørende "Limited Power Source" i IEC 60950 eller tilsvarende sikkerhedsstandarder. Anvend
den medfølgende strømforsyning (hvis muligt), eller kontakt Red-M og få en liste over godkendte
strømkilder.
Deutsch
WARNUNG: Verwenden Sie dieses Produkt nur mit einer Stromquelle, die die Anforderungen
bezüglich "begrenzter Stromquellen" gemäß IEC 60950 oder entsprechender Sicherheitsnormen
erfüllt. Verwenden Sie das im Lieferumfang enthaltene Netzteil (sofern zutreffend), oder fordern
Sie bei Red-M eine Liste der geeigneten Stromquellen an.
Español
PRECAUCIÓN: Emplee este producto únicamente con una fuente de alimentación que cumpla la
norma de seguridad IEC 60950 de alimentación limitada, o equivalente. Utilice la fuente de
alimentación suministrada, si es el caso, o consulte a Red-M para obtener una lista de fuentes de
alimentación apropiadas.
Flemish
OPGELET: gebruik dit product enkel met een voedingsbron die voldoet aan de "Minimum
voedingsbron"-vereisten van IEC 60950 of evenwaardige veiligheidsvoorschriften. Gebruik
bijhorende voedingsbron (indien deze geschikt is) of neem contact op met RED-M voor een lijst
van geschikte voedingsbronnen.
Français
ATTENTION: n'utilisez ce produit qu'avec une source d'énergie conforme à la norme IEC 60950 en
matière de « source d'énergie limitée », ou autre norme de sécurité équivalente. Utilisez
l'alimentation en courant fournie (si applicable) ou bien contactez Red-M pour obtenir une liste des
sources d'énergie adéquates.
Íslenska
VARÚÐ: Notið þessa vöru eingöngu með aflgjafa sem stenst kröfur í kaflanum um "aflgjafa með
takmarkað afl" í IEC 60950 (ÍST EN 60950) eða sambærilegra öryggisstaðla. Notið aflgjafann sem
fylgir (ef viðeigandi) eða fáið lista yfir nothæfa aflgjafa hjá umboðsaðila vörunnar.
Italiano
ATTENZIONE: Utilizzare questo prodotto solo con sorgenti di alimentazione che soddisfano i
requisiti di sicurezza IEC 60950 o equivalenti. Utilizzare l'alimentatore fornito (ove applicabile) o
contattare Red-M per ottenere un elenco delle sorgenti di alimentazione adeguate.
Nederlands
WAARSCHUWING: Gebruik dit product alleen met een voedingsbron die voldoet aan de "Minimum
voedingsbron"-vereisten van IEC 60950 of evenwaardige veiligheidsvoorschriften. Gebruik de
bijbehorende voedingsbron (indien van toepassing) of neem contact op met Red-M voor een lijst
van geschikte voedingsbronnen.
Norsk
FORSIKTIG: Dette produktet skal bare brukes med en strømkilde som tilfredsstiller kravene til
"Begrenset strømkilde" i IEC 60950 eller tilsvarende sikkerhetsstandard. Bruk den medfølgende
strømforsyningen (hvis en slik finnes) eller kontakt Red-M for å få en oversikt over passende
strømkilder.
Português
Advertência: Utilize este produto apenas com uma fonte de energia que respeite os requisitos
definidos em "Fontes de Energia Limitadas" da norma IEC 60950 ou dos padrões de segurança
equivalentes. Utilize a fonte de alimentação fornecida (se aplicável) ou contacte Red-M para obter
uma lista de fontes adequadas.
Suomi
MUISTUTUS: Käytä tätä tuotetta vain sellaisen virtalähteen yhteydessä, joka täyttää standardin
60950 "rajoitetun virtalähteen" tai muiden vastaavien standardien asettamat
turvallisuusvaatimukset. Käytä toimitettua virtalähdettä (jos asianmukaista) tai ota yhteys
RedM:ään sopivien virtalähteiden luettelon saamiseksi.
Svensk
FÖRSIKTIGT! Denna produkt får bara användas med en effektkälla som uppfyller kraven för
"Begränsad effektkälla" i IEC 60950 eller motsvarande säkerhetsnormer. Använd medföljande
effektkälla (i förekommande fall) eller begär en lista över lämpliga effektkällor från Red-M.
Σλληνικά
ΠΡΟΣΟΧΗ: Χρησιµοποιήστε αυτό το προϊόν µόνο µε πηγή ενέργειας που είναι σύµφω νη µε την
οδηγία του IΕC 60950 περί «Περιορισµένης Πηγής Ενέργειας» ή αντίστοιχων προδιαγ ραφών
ασφαλείας. Χρησιµοποιήστε την πηγή ενέργειας που παρέχεται (αν είναι κατάλληλη) ή
επικοινων
ή
στε
µ
ε τ
η
ν Red-M
γ
ια να σα
ς
π
ρ
ο
µη
θεύσει
µ
ε κατάλο
γ
ο συ
µβ
ατών π
ηγ
ών ενέ
ργ
εια
ς