
User Manual
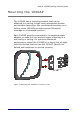
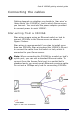
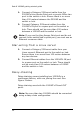
Table Of Contents
- Table of contents
- Introduction
- Mounting the 1000AP
- Figure 1: Mounting the 1000AP to a ceiling or wall
- To mount on a ceiling or wall:
- 1. Select a location on a ceiling or wall to mount the 1000AP (we recommend mounting on a ceiling).
- 2. Ensure the ceiling or wall can support the 1000AP’s weight (around 250 g or 8.5 oz). If in dou...
- 3. Install the Category 5 Ethernet cable according to whether you decided to ‘star-wire’ or ‘dais...
- 4. Use the mounting bracket as a template to mark out drill positions.
- 5. Drill two holes (43 mm apart) using a 5.5 mm drill bit. Ensure the two holes are vertically al...
- 6. Insert suitable fastenings into the holes (e.g. wall plugs).
- 7. Position the mounting bracket over the two holes and insert the appropriate screws.
- 8. Connect the cables from the hole in the ceiling/wall to the 1000AP.
- 9. Slide the 1000AP over the mounting bracket until it fits into the groove. Continue sliding unt...
- Connecting the cables
- Star-wiring from a 3000AS
- Star-wiring from a Linux server
- Daisy-chaining
- Figure 3: Daisy-chain installation
- 1. Connect a Category 5 Ethernet cable (with RJ-45 connectors) to the 1000AP’s IN port.
- 2. Connect the other end of the cable to the 3000AS’s blue Access Point port or purple Office LAN...
- 3. Connect the first 1000AP’s OUT port to the second 1000AP’s IN port. Ensure there is no more th...
- Using more complicated networks
- Connecting power
- 1. Connect the loose power cable to the country- specific mains power lead.
- 2. Connect the mains power lead to an electricity supply.
- 3. Insert the other end of the cable into the 1000AP’s DC 12v power port. The 1000AP’s LED indica...
- 4. The 1000AP is now ready to use. You can configure the 1000AP’s software features through the G...
- Configuring 1000APs
- To edit the 1000AP’s configuration
- 1. Log on to the management interface as an administrator from a management PC.
- 2. The AP List dialog displays with all connected access points. If a 1000AP is missing from this...
- 3. Click on a 1000AP’s name or hardware address to open the AP Stats dialog, which shows informat...
- 4. Click on AP Record to open the Bluetooth AP Edit dialog. In this dialog, you can rename the 10...
- To edit the 1000AP’s configuration
- Using Identify mode
- Reading the LED
- LED startup sequence
- 1. When power is connected, the LED is orange for about a second to indicate that power is on.
- 2. The LED flashes orange for a few seconds to indicate that the 1000AP is starting up and conduc...
- 3. The LED illuminates steady red after startup to indicate normal operation.
- 4. If the 1000AP has passed its startup tests but cannot either connect to Genos or obtain an IP ...
- 5. If there is a fatal error at any time, the LED illuminates steady orange. If it remains in thi...
- LED indicator status chart
- LED startup sequence
- 1000AP diagram
- Contact information
- Regulatory information
- The following regulatory statements apply to the Red-M 1000AP access point.
- By attaching themark to this product, we confirm:
- To conform with FCC rules regarding RF exposure, this equipment should be installed a minimum of ...
- Any changes or modifications not expressly approved by the manufacturer could void the user’s aut...
- This device has been designed to operate with an antenna that has a maximum gain of 0 dB. Antenna...
- To reduce potential radio interference to other users, the antenna type and its gain should be so...
- To prevent radio interference to the licensed service in Canada, this device is intended to be op...
- This product is designed to connect to "Bluetooth" compatible radio interfaces using the 2.4 GHz ...
- [Member States of the EEA are: Austria, Belgium, Denmark, Finland, France, Germany, Greece, Icela...
- English
- Dansk
- Deutsch
- Español
- Flemish
- Français
- Íslenska
- Italiano
- Nederlands
- Norsk
- Português
- Suomi
- Svensk

Red-M 1000AP getting started guide
9
Connecting the cables
Cabling depends on whether you decide to ‘star-wire’ or
‘daisy-chain’ the 1000AP(s), and to which Genos server
you connect. You must use the power adapter provided
to connect power to each 1000AP.
Star-wiring from a 3000AS
Star-wiring means using an Ethernet switch or hub to
connect 1000APs to the Genos server as shown in
Figure 2 below.
Star-wiring is recommended if you plan to install more
than two 1000APs. Star-wiring uses the 1000AP’s IN port
to connect the cable from the switch or hub, which is
connected to your Genos server.
Figure 2: Star-wire installation
Note: When connecting the 3000AS to a switch or hub’s
uplink port, you can use a standard Ethernet cable. To
connect from the Access Point port to a switch/hub’s
standard ports, you must use an Ethernet crossover cable.
Do not use a 10Mbps-only hub for connecting 1000APs.