
Product Manual

OPERATION
WARNING:
DO NOT RUN THE PUMP BEFORE PRIMING IT; THE SEAL AND
IMPELLER COULD BE PERMANENTLY DAMAGED.
PRIMING
Note:Youwillneedenoughwatertofillthesuctionlineandcas-
ing. Priming time depends on distance from water source to pump
(5-15min.).
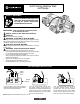
Using an in-line check valve:
1. Opendischargevalveonservicelineandnearbytaptomonitor
water flow.
2. Pour clean water through priming plug opening at top of casing
until water starts flowing out the vent plug hole.
3. Installenclosedventplug,tightenlooselywithawrench.
4. Continuefillingpumpuntilwaterflowsoutofthepriminghole.
5. Installenclosedprimingplug,handtighten.
6. Startpump.Ifatapisvisibleyoumayseeashortdischargeof
water,whichwilllast5-10seconds.
7. Run the pump for 2 minutes, and then shut it off. Remove the
vent plug and priming plug.
8. Youhavecompletedthefirstprimingcycle,consistingofsteps2to
7.Thisprocesswillhavetoberepeatedfrom2to6times,depend-
ing on the length of your suction line. (Approximately one priming
cycleforevery5feetofsuctionline.)Youwillknowwhentostop
because the pump will begin to pump water continuously.
9. Once the pump begins pumping water continuously, firmly
tighten the vent plug and priming plug with a wrench.
10.Ifthe pumpdoesnotdrawwaterwithin8tries,shutitoffand
check for suction leaks.
Using a foot valve:
1. Opendischargevalveonservicelineandnearbytaptomonitor
water flow.
2. Pour clean water through priming plug opening at top of casing
until the suction line is full and water starts flowing out the vent
plughole.Youwillneedapproximately1literofwaterforevery3
ft. of suction line.
3. Followsteps3through6above.Ifwithin2minuteswaterisnot
being pumped continuously, stop the pump. Remove vent plug
andprimingplug.Repeatsteps2through6above.Ifthisdoes
not work, stop the pump and check the suction line for leaks.
4. Once the pump begins pumping water continuously, firmly
tighten the vent plug and priming plug with a wrench.
DRAINING
Shouldtheunitbesubjecttofreezing,itwillbenecessarytodrain
thepumpandtank.Todothis,shutoffthepowertothepumpat
themainelectricalservicepanel.Openatapinthewatersystemto
release the pressure. Remove the drain and fill plugs from the pump
casing. Remove the pressure tank drain plug (if so equipped). Allow
ample time for the system to drain before reinstalling the plugs!
MAINTENANCE
WARNING - RISK OF ELECTRICAL SHOCK
Before servicing motor operated equipment, shut off the power
at the main electrical panel and disconnect the power supply
from motor and accessories. Use safe working practices during
servicing of equipment.
a) Lubrication:Thepumprequiresnone.Refertomotormanufac-
turer's instructions for motor lubrication.
b) Cleanout Plug:Forapplicationswherecloggingisaproblem,a
1/4"NPTplughasbeenprovidedforaccesstocleanthenozzle/
venturi.Thisplugislocateddirectlybelowthesuctionopening
in the front of the casing. IMPORTANT! Before removing the
cleanout plug, shut off the power to the pump at the main
electrical panel. Open a tap in the water system to release
the pressure.
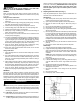
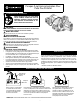
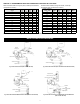
c) Replacing Mechanical Seal: (See Fig. 3)
Only duly qualified persons should perform maintenance on
electricaland/ormechanicaldevices.
Disassembly:
1) Shutoffthepowertothepumpatthemainservicepanel
and disconnect the power supply from motor.
2) Openatapinthewatersystemtoreleasethepressure.
3) Remove the drain and fill plugs to allow the pump to
drain.
4) Disconnectthetubeleadingtothepressureswitch.
5) Removethefourbolts(1)andremovecasing(2).
6) Prythediffuser(4)outofthecasingusingtwoslottedscrew-
drivers for leverage.
7) Remove cap (5) and insert a screwdriver to prevent the shaft
fromturningwhileunscrewingtheimpeller(6)(GEmotors).
ForA.O. Smith motors, remove rear cover and hold the
shaft using a flat wrench inserted from the side, through the
openingintheendhousing.Impellerhasright-handthread.
Ifimpellercannotbeturnedbyhand,insertaflatobjectinto
the impeller vane.
8) Slip the rotating seal (7) off the shaft and remove the seal
plate (8).
9) Remove the ceramic seal seat (9) from the seal plate.
Reassembly:
1) Cleanallthepartsthoroughlybeforeassembling.
2) Lightlylubricate(soapywater)therubbercapontheceramic
seal (9) and push it into the seal plate using thumbs only.
Makesurethesmoothsurfaceoftheceramicseatfaces
outwards.
NOTE:Ifthepumpwillremainoutofserviceforlongerthan
one week, the seal components must be installed dry (no
lubrication).
3) Put the seal plate back on the motor.
4) Lubricatetherotatingseal(7)withsoapywaterandslipit
onto the shaft with the ‘carbon’ ring towards the ceramic
seat.
5) Replacetheimpeller(6)andthediffuser(4).
6) Replace the casing (2) making sure that the gasket is not
damaged and is in place.
7) Reconnect the tubes to the casing and to the pressure
switch.
8) Reconnect the power.
9) Prime pump, start, check for leaks.
Fig. 3
4