
User Manual


11
F1
F2
F1
F2
F1
F2
F1
F2
F1
F2
F1
F2
D
P
D
P D
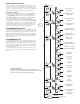
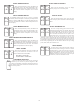
Analog Input Setup
Parameters
User Input/Function Key
Parameters
D
D
D
Factory Service
Operations
Display Loop
2 seconds
Pro
NO
Pro
INPt
Pro
NO
INPt
AnLG
INPt
USEr
Pro
Out
Pro
dISP
F1
F2
P
D
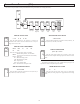
Digital Output Setup
Parameters
Analog Output Setup
Parameters
Out
dGtL
Out
AnLG
F1
F2
D
Pro
Port
D
Pro
FACt
Pro
End
F1
F2
P
D
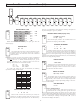
USB Configuration
Parameters
Serial Communications
Parameters
Port
USb
Port
SErL
F1
F2
F1
F2
P
D
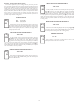
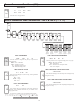
Display - General
Configuration Parameters
Display - Zone
Configuration Parameters
dISP
CNFG
dISP
ZONE
F1
F2
Display - Line 2
Parameters
Display - Min/Max
Configuration Parameters
dISP
LOCS
dISP
HILO
F1
F2
Display - Security Code
Configuration Parameters
dISP
COdE
Pro
Pid
F1
F2
F1
F2
P
D
F1
F2
D
Pro
ALr
P
D
PID Control
Parameters
PID Setpoint
Parameters
Pid
CtrL
Pid
SP
F1
F2
PID
Parameters
Output Power
Parameters
Pid
Pid
Pid
PWr
F1
F2
On/Off
Parameters
Pid
ONOF
F1
F2
PID Tuning
Parameters
Pid
tunE
Alarm
Parameters
SLCt
ALn
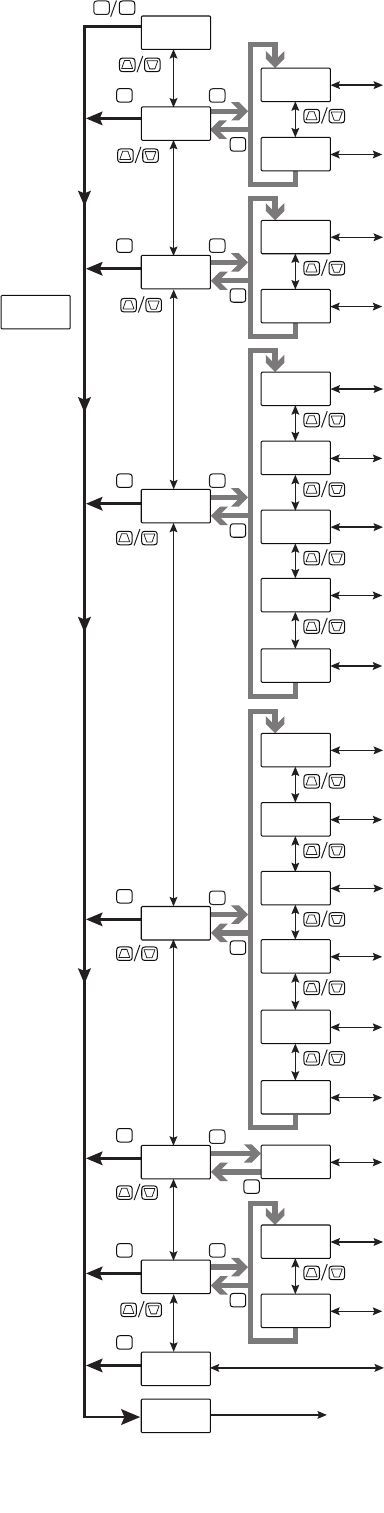
In Programming Menu:
Top line is green to indicate top level programming modules
Top line is orange to indicate module menu or sub-menu selection
Top line is red to indicate a changeable parameter.
SELECTION/VALUE ENTRY
For each parameter, the top line display shows the parameter while
the bottom line shows the selections/value for that parameter. The
and keys are used to move through the selections/values for the
parameter. Pressing the P key, stores and activates the displayed
selection/value. This also advances the meter to the next parameter.
Numerical Value Entry
If the parameter is programmed for enter (Entr), the ! and @ keys
are used to change the parameter values in any of the display loops.
The ! and @ keys will increment or decrement the parameter value.
When the ! or @ key is pressed and held, the value automatically
scrolls. The longer the key is held the faster the value scrolls.
For large value changes, press and hold the ! or @ key. While
holding that key, momentarily press the opposite arrow key ( @ or !)
to shift decades (10’s 100’s, etc), or momentarily press the D key and
the value scrolls by 1000’s as the arrow key is held. Releasing the arrow
key removes the decade or 1000’s scroll feature. The arrow keys can
then be used to make small value changes as described above.
PROGRAMMING MODE EXIT
To exit the Programming Mode, press and hold the D key (from
anywhere in the Programming Mode) or press the P key with Pro NO
displayed. This will commit stored parameter changes to memory and
return the meter to the Display Mode. If a parameter was just changed,
the P key must be pressed to store the change before pressing the D key.
(If power loss occurs before returning to the Display Mode, verify recent
parameter changes.)
PROGRAMMING TIPS
It is recommended to start with the Input Parameters and proceed
through each module in sequence. If lost or confused while programming,
press and hold the D key to exit programming mode and start over. It is
recommended that program settings be recorded as programming is
performed. When programming is complete lock out programming with
a user input or lock-out code.
Factory Settings may be completely restored in the Factory Service
Operations module. This is useful when encountering programming
problems.