
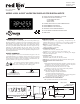
User guide
Once assembled, the LPAX and MPAX have all the same functions and
capabilities of our PAX Series Intelligent Panel Meters. Therefore, you will find
the appropriate PAX information packed with the MPAX Module. Simply
follow the instructions to wire and program the display for your application.
TROUBLESHOOTING
For technical assistance, contact technical support.
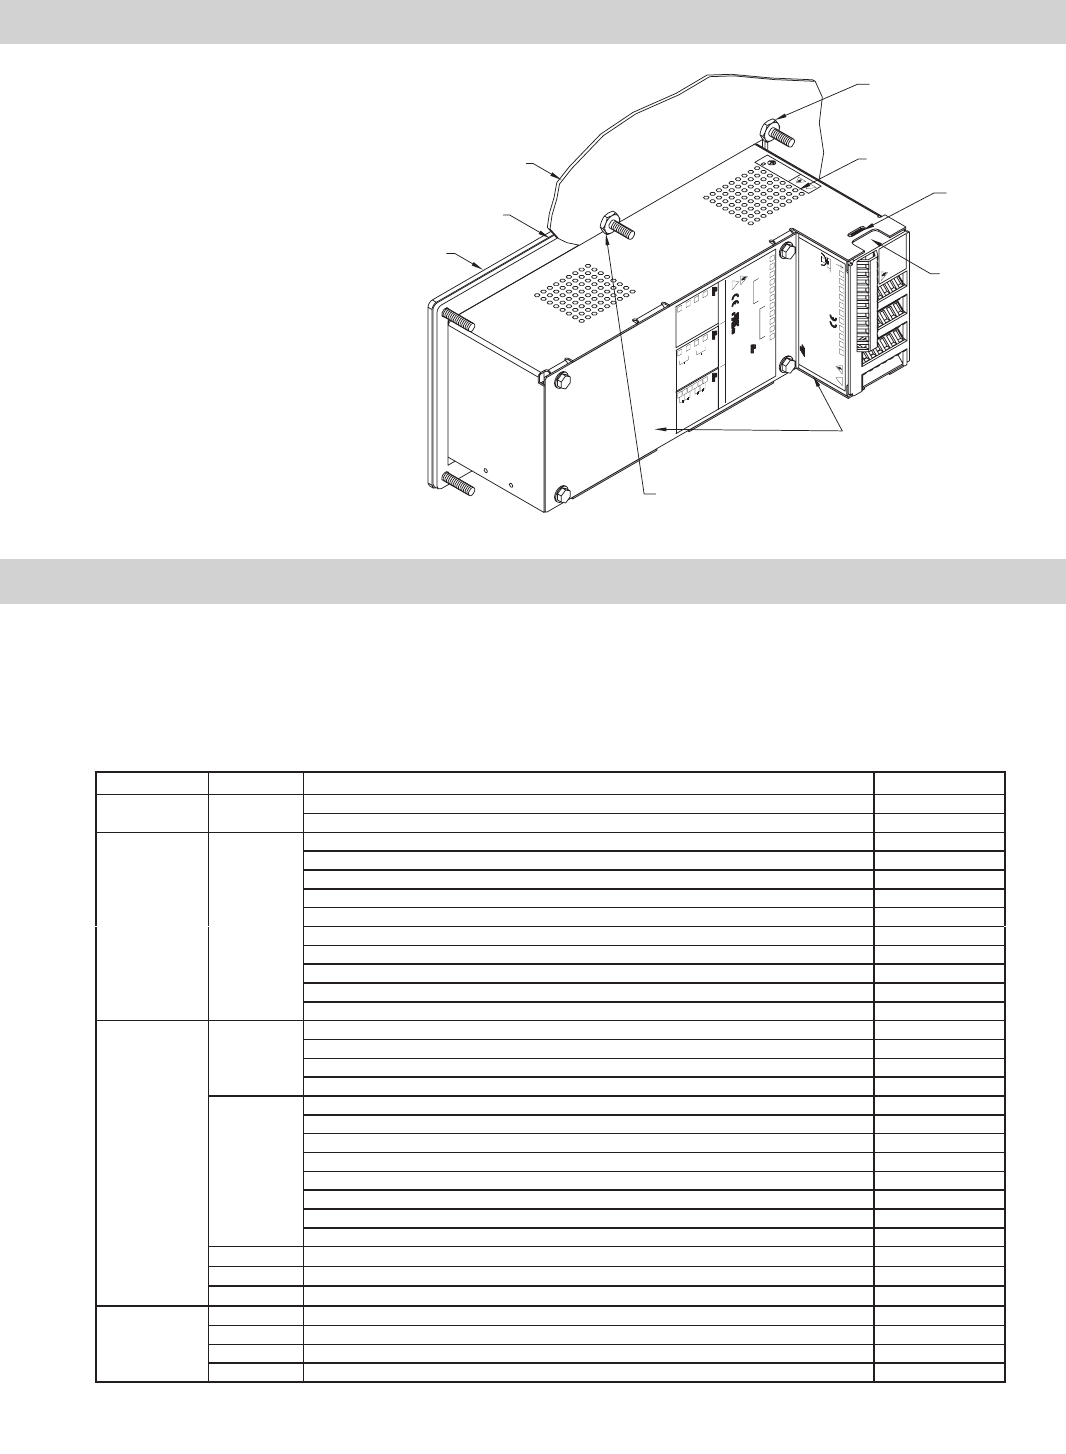
2.0 INSTALLING THE DISPLAY
3.0 WIRING AND PROGRAMMING THE DISPLAY
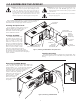
LPAX DISPLAY INSTALLATION
The LPAX display is intended to be mounted into a panel or enclosure. The display is
provided with a gasket to provide a water-tight seal. The recommended minimum panel
thickness for NEMA 4/IP65 sealing is 0.060" (1.57 mm).
For panel mounting, prepare the panel cut-out to the dimensions
shown. The supplied template may be used to mark the cut-out
and hole locations on the panel. After the panel cut-out has been
deburred, slide the panel gasket over the rear of the display and
onto the mounting studs. Insert the display into the panel
cut-out as illustrated in Figure 3. Install six # 10-32 keps
nuts (supplied) and tighten evenly for uniform gasket
compression. Do not over-tighten the nuts.
By using additional mounting accessories, the LPAX
can be surface-wall mounted, suspended, or bottom mounted.
Separate installation instructions are provided with the
mounting accessories.
Environment And Cleaning
The display should be installed in a location that does not
exceed the maximum operating temperature and provides good
air circulation. Placing the system near devices that generate
excessive heat should be avoided.
The bezel should be cleaned only with a soft cloth and neutral
soap product. Do NOT use solvents. Continuous exposure to
direct sunlight may accelerate the aging process of the bezel.
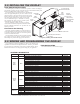
CAUTION:
1234567891011
DISCONNECT ALL
POWER BEFORE INSTALLING OR
REMOVING MODULE
SLOT
TWIST
!
WHILE FIRMLY DEPRESSING REAR FINGER TABS (TOP & BOTTOM),
INSERT SCREWDRIVER BLADE (3/16" OR 1/4") INTO NARROW SLOT
(AT THE ARROW) AND TWEIST IN THE DIRECTION SHOWN.
TO REMOVE MODULE:
MODEL LPAX
RED LION CONTROLS
YORK, PA. MADE IN U.S.A.
PAXCDC10
RS485 COMMUNICATION
12
13
14
15
- B(-)
- A(+)
- COMM
- N/C
1 2 3 4
5 6
7 8 9 10
11
~~
AC AC
85-250VAC
50/60Hz
14VA
COMMUNICATION OPTION ANALOG OUT OPTION SETPOINT (SP) OPTION
MODEL PAXD
RED LION CONTROLS
YORK, PA. MADE IN U.S.A.
SEE LITERATURE FOR
JUMPER SELECTION
SIGNAL INPUTS
USER INPUTS
VOLT/OHM
CURRENT
+EXCITATION
COMM
1
2
3
N/C
COMM
!
R
-19
17
+18
-
+16
ANALOG OUTPUT
PAXCDL10
RLY3
25
21
RLY2
22
COMM
RLY1
20
QUAD RELAY S.P.
PAXCDS20
0-10V
ANALOG
OUTPUT
OUTPUT
ANALOG
0-20mA
24
23
COMM
RLY4
RELAYS RATED
3A @ 250VAC
(RESISTIVE LOAD)
MODULE
RETENTION
LATCH (TOP
AND BOTTOM)
MOUNTING
PANEL
PANEL
GASKET
FRONT
PANEL
MODULE RELEASE
FINGER TAB
(TOP & BOTTOM)
CASE
VENT
HOLES
REAR COVER PLATE
CAUTION
DISCONNECT
ALL POWER
BEFORE
OPENING
CONNECTED TO
MUST BE
METAL PANEL
MA2204X
E
!
CONNECT THIS STUD
TO A PROTECTIVE
EARTHING SYSTEM
MOUNTING STUDS AND NUTS
(6 PLACES)
Figure 3, Installing The LPAX Into A Panel
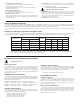
ORDERING INFORMATION
TYPE MODEL NO. DESCRIPTION PART NUMBERS
Display LPAX
6-Digit Display for Digital MPAX Modules LPAX0600
6-Digit Display for MPAXCK (Clock/Timer) and MPAXTM Only LPAXCK00
Digital
Input
Module
MPAX
Count/Rate Indicator Module, AC Powered MPAXI020
Count/Rate Indicator Module, DC/24 VAC Powered MPAXI030
Count Indicator Module, AC Powered MPAXC020
Count Indicator Module, DC/24 VAC Powered MPAXC030
Rate Indicator Module, AC Powered MPAXR020
Rate Indicator Module, DC/24 VAC Powered MPAXR030
Clock/Timer Module, AC Powered MPAXCK00
Clock/Timer Module, DC/24 VAC Powered MPAXCK10
Timer Module, AC Powered MPAXTM00
Timer Module, DC/24 VAC Powered MPAXTM10
Optional
Plug-In
Cards
PAXCDS
Dual Setpoint Relay Output Card PAXCDS10
Quad Setpoint Relay Output Card PAXCDS20
Quad Setpoint Sinking Open Collector Output Card PAXCDS30
Quad Setpoint Sourcing Open Collector Output Card PAXCDS40
PAXCDC*
RS485 Serial Communications Output Card with Terminal Block PAXCDC10
Extended RS485 Serial Communications Output Card with Dual RJ11 Connector PAXCDC1C
RS232 Serial Communications Output Card with Terminal Block PAXCDC20
Extended RS232 Serial Communications Output Card with 9 Pin D Connector PAXCDC2C
DeviceNet Communications Card PAXCDC30
Modbus Communications Card PAXCDC40
Extended Modbus Communications Card with Dual RJ11 Connector PAXCDC4C
Profibus-DP Communications Card PAXCDC50
PAXCDL*
Analog Output Card PAXCDL10
PAXUSB*
PAX USB Programming Card (Not included in PAX product UL E179259 file). PAXUSB00
PAXRTC*
Real Time Clock Card for MPAXCK (Clock/Timer) Only PAXRTC00
Accessories
SFCRD**
Crimson 2 PC Configuration Software for Windows 98, ME, 2000 and XP (for MPAXI) SFCRD200
ENC9
NEMA 4 Enclosure for LPAX ENC90000
SHR
Shroud for LPAX SHRLPAX0
MB
Mounting Bracket for LPAX MBLPAX00
*Refer to “Selecting Your Display Components and Option Cards.”
**Available as a FREE download from the Red Lion website. www.redlion.net