
Installation guide
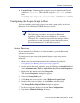


Sun Java System Web Proxy Server 209
Chapter 5: Initial Setup
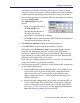
A default list of networks (netmasks) to test appears. You may use the
defaults provided or add your own. These netmasks can reside in different
network segments depending upon the IP address ranges to be filtered.
3. If the network you want to test with the NIC does not appear in the default
list, click Add Network.
The Add Network dialog box
appears.
a. Enter a new netmask value in
the Network ID field.
The subnet mask defaults to
255.0.0.0 and changes
appropriately as the netmask is defined.
b. Click OK to return to the Websense Traffic Visibility Tool dialog box.
Your new network appears in the list.
4. Select Remove Network to delete a network from the list.
5. Click Start Test to begin testing all the networks in the list.
The counter in the IP Address Count column should begin recording
internet traffic immediately from the networks listed. The counter
increments each time the NIC detects an individual IP address from the
target network in a passing packet. The activity bar at the bottom of the
dialog box indicates that a test is in progress.
If the count for a network remains at zero or is very low, the selected NIC
cannot see the traffic it is supposed to monitor.
6. If the Network Agent NIC is unable to see the desired traffic, perform one
or both of the following tasks:
If the installation machine has multiple NICs, select a different card
to test. If this card can see the desired traffic, configure Network
Agent to use this card. For instructions, see the Network Agent
chapter in the Administrator’s Guide for Websense Enterprise and
Web Security Suite.
Resolve network configuration issues to make sure that the NIC can
see the desired traffic. This might involve connecting to a different
router or configuring for port spanning in a switched environment.
See Chapter 2: Network Configuration for deployment information.
Make the necessary changes and retest the NIC.