
Installation guide


Sun Java System Web Proxy Server 163
Chapter 4: Installing Websense Enterprise or Web Security Suite
Windows
To add Websense components in a Windows environment:
1. Log on to the installation machine with domain and local administrator
privileges.
If you are adding User Service or DC Agent, this will assure that they
have administrator privileges on the domain.
2. Close all applications and stop any antivirus software.
3. Go to the folder where you extracted the Windows Websense installer
files, and double-click
Setup.exe to launch the installer.
4. Click Next in the welcome screen.
A dialog box appears asking you what action you want to take with the
Websense components the installer has detected on the machine.
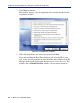
5. Select Add Websense components and click Next.
The installer displays a product selection screen.
6. If you are running the Websense Enterprise installer, select Websense
Enterprise. If you are running the Web Security Suite installer, select
Web Security Suite.
Note
Before adding new components, we recommend that you
perform a full system backup as a fallback strategy. This
backup allows you to restore your current system with
minimum downtime, should you decide to do so.
Important
User Service and DC Agent must have administrator
privileges on the network to retrieve user login information
from the domain controller. Without this information,
Websense software cannot filter by users and groups. If
you cannot install these components with such privileges,
you can configure domain administrator privileges for
these services after installation. For instructions, see
Configure Domain Administrator Privileges, page 210.