
Installation guide


18 Chapter 1. Getting Started
To create a user account graphically:
1. In GNOME, click the Start Here icon on the panel at the bottom of your desktop. In the new
window that opens, click the System Settings icon, and then click the User Manager icon. You
can also select GNOME Main Menu => Programs => System => User Manager.
In KDE, select KDE Main Menu => System => User Manager.
2. If you are not logged in as root, you will be prompted for your root password.
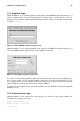
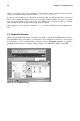
3. The window shown in Figure 1-7 will appear. Click on New User.
Figure 1-7. The User Configuration Tool
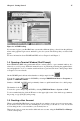
4. In the New User dialog box, enter a username (this can be an abbreviation or nickname), the
full name of the user for whom this account is being created, and a password (which you will
enter a second time for verification). The name of this user’s home directory and the name of
the login shell should appear by default. For most users, you can accept the defaults for the
other configuration options. Refer to the Official Red Hat Linux Customization Guide for details
about the additional options.
5. Click OK. The new user will appear in the user list, and the user account creation is complete.
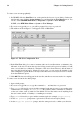
To create a user account from a shell prompt:
1. Open a shell prompt.
2. If you are not logged in as root, type the command su - and enter the root password.
3. Type useradd followed by a space and the username for the new account you are creating at the
command line (for example, useradd carole). Press [Enter]. Often, usernames are variations
on the user’s name, such as jsmith for John Smith. User account names can be anything from
the user’s name, initials, or birthday to something more creative.
4. Type passwd followed by a space and the username again (for example, passwd carole).
5. At the New password: prompt enter a password for the new user and press [Enter].
6. At the Retype new password: prompt, enter the same password to confirm your selection.