
Installation guide


Chapter 14. Frequently Asked Questions 143
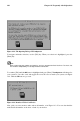
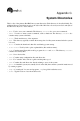
Figure 14-3. The Monitor Setup Dialog
You will have quite a few monitor choices — the hash mark (#) indicates your position in the list. Use
your [Up Arrow] and [Down Arrow] keys to move through the list, or use the [Home], [End], [Page
Up] and [Page Down] keys. You can also jump to the manufacturer’s place on the list by typing in the
first letters of the name (such as ViewSonic) on your keyboard.
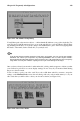
Tip
If you do not find your monitor among the listed makes and models, you can specify your monitor’s
horizontal and vertical sync frequencies by choosing Custom in the list. Refer to your monitor’s
documentation for information about its correct frequency rates. Be careful! Do not select a frequency
range which exceeds your monitor’s capacity, because you could damage or destroy it.
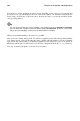
Once you have selected your monitor’s make and model, a dialog window appears to inform you that
your card has be probed for its correct display settings. Do not worry if your monitor blinks during
the process; that is normal.
You do not have to probe your video card. If you choose No when asked if you want to accept the
settings on the Monitor Probe screen, the next dialog will ask you how much memory is on your
video card, then you will be able to select your chosen resolution (see Figure 14-4).
Figure 14-4. Select Video Modes