
Specifications

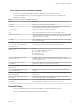

Table Of Contents
- Getting Started with VMware Player
- Contents
- Getting Started with VMware Player
- Introduction and System Requirements
- Installing and Using Player
- Creating Virtual Machines
- Understanding Virtual Machines
- Preparing to Create a Virtual Machine
- Create a Virtual Machine
- Use Easy Install to Install a Guest Operating System
- Install a Guest Operating System Manually
- Importing Virtual Machines
- Installing and Upgrading VMware Tools
- Installing VMware Tools
- Upgrading VMware Tools
- Configure Software Update Preferences
- Configure VMware Tools Updates for a Specific Virtual Machine
- Manually Installing and Upgrading VMware Tools
- Manually Install or Upgrade VMware Tools in a Windows Virtual Machine
- Manually Install or Upgrade VMware Tools in a Linux Virtual Machine
- Manually Install or Upgrade VMware Tools in a NetWare Virtual Machine
- Manually Install or Upgrade VMware Tools in a Solaris Virtual Machine
- Manually Install or Upgrade VMware Tools in a FreeBSD Virtual Machine
- Start the VMware User Process Manually If You Do Not Use a Session Manager
- Uninstall VMware Tools
- Virtual Machine Files
- Using Virtual Machines
- Starting Virtual Machines in Player
- Stopping Virtual Machines in Player
- Transferring Files and Text
- Using the Drag-and-Drop Feature
- Using the Copy and Paste Feature
- Using Shared Folders
- Mapping a Virtual Disk to the Host System
- Add a Host Printer to a Virtual Machine
- Using Removable Devices in Virtual Machines
- Install New Software in a Virtual Machine
- Changing the Virtual Machine Display
- Download a Virtual Appliance in Player
- Remove a Virtual Machine from the Library in Player
- Configuring and Managing Virtual Machines
- Change the Name of a Virtual Machine
- Change the Guest Operating System for a Virtual Machine
- Change the Working Directory for a Virtual Machine
- Change the Virtual Machine Directory for a Virtual Machine
- Change the Memory Allocation for a Virtual Machine
- Configuring Video and Sound
- Moving Virtual Machines
- Delete a Virtual Machine
- View the Message Log for a Virtual Machine
- Using the VIX API
- Configuring and Managing Devices
- Configuring DVD, CD-ROM, and Floppy Drives
- Configuring a USB Controller
- Configuring and Maintaining Virtual Hard Disks
- Configuring Virtual Ports
- Add a Virtual Parallel Port to a Virtual Machine
- Configure a Virtual Parallel Port on a Linux 2.6.x Kernel Host
- Configure Permissions for a Parallel Port Device on a Linux Host
- Troubleshoot ECR Errors for Parallel Ports
- Add a Virtual Serial Port to a Virtual Machine
- Change the Input Speed of a Serial Connection
- Configuring Generic SCSI Devices
- Configuring Eight-Way Virtual Symmetric Multiprocessing
- Configuring Keyboard Features
- Modify Hardware Settings for a Virtual Machine
- Configuring Network Connections
- Index

Linux Command Line Installation Options
You can use command line installation options to install Player on a Linux host system.
To use the installation options, you must be logged in as root. Exit from the root account after the
installation is finished.
Table 2‑1. Linux Command Line Installation Options
Option Description
--console
Enables you to use the terminal for installation.
--custom
Use this option to customize the locations of the installation directories and set
the hard limit for the number of open file descriptors.
--eulas-agreed
Allows you to silently accept the product EULAs.
--gtk
Opens the GUI-based VMware installer, which is the default option.
--ignore-errors or -I
Allows the installation to continue even if there is an error in one of the installer
scripts. Because the section that has an error does not complete, the component
might not be properly configured
--regular
Shows installation questions that have not been answered before or are required.
This is the default option.
--required
Shows the license agreement only and then proceeds to install Player.
--set-setting vmware-installer
installShortcuts
Adds shortcuts when Workstation is installed. The default is yes .
--set-setting vmware-installer
libdir /opt
Creates:
n
/opt/vmware (Workstation or Player)
n
/opt/vmware-installer
n
/opt/vmware-vix
The default is /usr/lib .
--set-setting vmware-installer
prefix /usr/local
Installs executable files you run directly (ex: vmware, vmplayer, vmware-
networks, etc.) here. Remainder of the product distributed under libdir-derived
paths. The default is /usr .
--set-setting vmware-player
serialNumber
Lets you enter the license key when Player is installed. Enter the license key with
hyphens, for example, xxxxx-xxxxx-xxxxx-xxxxx-xxxxx.
--set-setting vmware-player-app
simplifiedUI
Turn on or off certain UI features of Player. The default is no.
--set-setting vmware-player-app
softwareUpdateEnabled
Enables automatic upgrades for VMware Player when a new build becomes
available.
--set-setting vmware-player-app
softwareUpdateURL
Specifies a custom URL for managing software updates (separate from
vmware.com).
--set-setting vmware-player-app
supportURL
Set a support URL or email alias specifically for your users to contact with
product issues through the or Player Help menu.
--set-setting vmware-workstation
serialNumber
Lets you enter the license key when Workstation is installed. Enter the license
key with hyphens, for example, xxxxx-xxxxx-xxxxx-xxxxx-xxxxx.
Uninstall Player
You must uninstall the previous version of Player before you can install the latest version.
How you uninstall Player depends on the host system platform.
Chapter 2 Installing and Using Player
VMware, Inc. 15