
Specifications

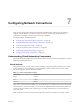
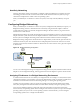

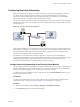
Table Of Contents
- Getting Started with VMware Player
- Contents
- Getting Started with VMware Player
- Introduction and System Requirements
- Installing and Using Player
- Creating Virtual Machines
- Understanding Virtual Machines
- Preparing to Create a Virtual Machine
- Create a Virtual Machine
- Use Easy Install to Install a Guest Operating System
- Install a Guest Operating System Manually
- Importing Virtual Machines
- Installing and Upgrading VMware Tools
- Installing VMware Tools
- Upgrading VMware Tools
- Configure Software Update Preferences
- Configure VMware Tools Updates for a Specific Virtual Machine
- Manually Installing and Upgrading VMware Tools
- Manually Install or Upgrade VMware Tools in a Windows Virtual Machine
- Manually Install or Upgrade VMware Tools in a Linux Virtual Machine
- Manually Install or Upgrade VMware Tools in a NetWare Virtual Machine
- Manually Install or Upgrade VMware Tools in a Solaris Virtual Machine
- Manually Install or Upgrade VMware Tools in a FreeBSD Virtual Machine
- Start the VMware User Process Manually If You Do Not Use a Session Manager
- Uninstall VMware Tools
- Virtual Machine Files
- Using Virtual Machines
- Starting Virtual Machines in Player
- Stopping Virtual Machines in Player
- Transferring Files and Text
- Using the Drag-and-Drop Feature
- Using the Copy and Paste Feature
- Using Shared Folders
- Mapping a Virtual Disk to the Host System
- Add a Host Printer to a Virtual Machine
- Using Removable Devices in Virtual Machines
- Install New Software in a Virtual Machine
- Changing the Virtual Machine Display
- Download a Virtual Appliance in Player
- Remove a Virtual Machine from the Library in Player
- Configuring and Managing Virtual Machines
- Change the Name of a Virtual Machine
- Change the Guest Operating System for a Virtual Machine
- Change the Working Directory for a Virtual Machine
- Change the Virtual Machine Directory for a Virtual Machine
- Change the Memory Allocation for a Virtual Machine
- Configuring Video and Sound
- Moving Virtual Machines
- Delete a Virtual Machine
- View the Message Log for a Virtual Machine
- Using the VIX API
- Configuring and Managing Devices
- Configuring DVD, CD-ROM, and Floppy Drives
- Configuring a USB Controller
- Configuring and Maintaining Virtual Hard Disks
- Configuring Virtual Ports
- Add a Virtual Parallel Port to a Virtual Machine
- Configure a Virtual Parallel Port on a Linux 2.6.x Kernel Host
- Configure Permissions for a Parallel Port Device on a Linux Host
- Troubleshoot ECR Errors for Parallel Ports
- Add a Virtual Serial Port to a Virtual Machine
- Change the Input Speed of a Serial Connection
- Configuring Generic SCSI Devices
- Configuring Eight-Way Virtual Symmetric Multiprocessing
- Configuring Keyboard Features
- Modify Hardware Settings for a Virtual Machine
- Configuring Network Connections
- Index

Configure Bridged Networking for an Existing Virtual Machine
You can configure bridged networking for an existing virtual machine.
To configure bridged networking for a new virtual machine, select Customize Hardware when you run the
New Virtual Machine wizard.
Procedure
1 Select the virtual machine and select Player > Manage > Virtual Machine Settings.
2 On the Hardware tab, select Network Adapter.
3 Select Bridged: Connected directly to the physical network.
4 If you use the virtual machine on a laptop or other mobile device, select Replicate physical network
connection state.
This setting causes the IP address to be renewed when you move from one wired or wireless network to
another.
5 Click OK to save your changes.
Configuring Network Address Translation
When you install Player on a Windows or Linux host system, a NAT network (VMnet8) is set up for you.
When you use the New Virtual Machine wizard to create a typical virtual machine, the wizard configures
the virtual machine to use the default NAT network.
With NAT, a virtual machine does not have its own IP address on the external network. Instead, a separate
private network is set up on the host system. In the default configuration, virtual machines get an address
on this private network from the virtual DHCP server.
Figure 7‑2. NAT Configuration
virtual
network
adapter
virtual network switch
(VMnet8)
virtual machine
DHCP server
network
NAT
device
The virtual machine and the host system share a single network identity that is not visible on the external
network. NAT works by translating the IP addresses of virtual machines in the private network to the IP
address of the host system. When a virtual machine sends a request to access a network resource, it appears
to the network resource as if the request is coming from the host system.
The host system has a virtual network adapter on the NAT network. This adapter enables the host system
and virtual machines to communicate with each other. The NAT device passes network data between one or
more virtual machines and the external network, identifies incoming data packets intended for each virtual
machine, and sends them to the correct destination.
Getting Started with VMware Player
108 VMware, Inc.