
Installation guide


74 Chapter 6. Network Configuration
This chapter will discuss each of these steps for each type of network connection.
6.2. Establishing an Ethernet Connection
To establish an Ethernet connection, you need a network interface card (NIC), a network
cable (usually a CAT5 cable), and a network to connect to. There are different speeds to
networks; make sure your NIC is compatible with the network to which you want to connect.
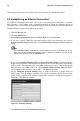
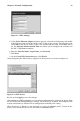
To add an Ethernet connection, follow these steps:
1. Click the Devices tab.
2. Click the Add button.
3. Select Ethernet connection from the Device Type list, and click Next.
4. If you have already added the network interface card to the hardware list, select it
from the Ethernet card list. Otherwise, select Other Ethernet Card to add the hardware
device.
Note
The installation program usually detects supported Ethernet devices and prompts you to con-
figure them. If you configured any Ethernet devices during the installation, they will already
appear in the hardware list on the Hardware tab.
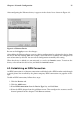
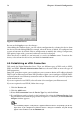
5. If you selected Other Ethernet Card, the Select Ethernet Adapter window appears.
Select the manufacturer and model of the Ethernet card. Select the device name. If this
is the system’s first Ethernet card, select eth0 as the device name, if this is the second
Ethernet card, select eth1, and so on. The Network Administration Tool also allows
you to configure the resources for the NIC. Click Next to continue.
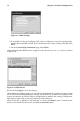
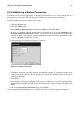
6. On the Configure Network Settings page as shown in Figure 6-1, choose between
DHCP and a static IP address. You may also specify a hostname for the device. If the
device receives a different IP address each time the network is started, do not specify a
hostname. Click Next to continue.
Figure 6-1. Ethernet Settings
7. Click Finish on the Create Ethernet Device page.