
Installation guide


68 Chapter 5. Software RAID Configuration
• For Allowable Drives, select the drive on which RAID will be created. If you have multi-
ple drives, all drives will be selected here and you must deselect those drives which will
not have the RAID array on them.
• Enter the size that you want the partition to be.
• Select Fill to maximum allowable size if you want the partition to grow to fill all available
space on the hard disk. If you make more than one partition growable, the partitions will
share the available free space on the disk.
• Select Force to be a primary partition if you want the partition to be a primary partition.
• Select Check for bad blocks? if you want the installation program to check for bad blocks
on the hard drive before formatting it.
Continue these steps to create as many partitions as needed for your RAID setup. Notice that
all the partitions do not have to be RAID partitions. For example, you can configure only the
/home partition as a software RAID device.
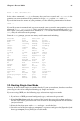
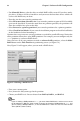
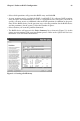
Once you have all of your partitions created as software RAID partitions, select the Make
RAID button on the Disk Druid main partitioning screen (see Figure 5-3).
Next, Figure 5-2 will appear, where you can make a RAID device.
Figure 5-2. Making a RAID Device
• First, enter a mount point.
• Next, choose the filesystem type for the partition.
• Choose your RAID level. You can choose from RAID 0, RAID 1, and RAID 5.
Note
If you are making a RAID partition of /boot, you must choose RAID level 1 and it must use one of
the first two drives (IDE first, SCSI second). If you are not creating a RAID partition of /boot, and
you are making a RAID partition of /, it must be RAID level 1 and it must use one of the first two
drives (IDE first, SCSI second).