
Installation guide


Chapter 2. Kickstart Configurator 51
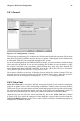
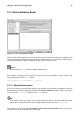
2.8.1. General
Figure 2-9. X Configuration - General
The first step in configuring X is to choose the default color depth and resolution. Select them
from their respective pulldown menus. Be sure to specify a color depth and resolution that
is compatible with the video card and monitor for the system.
If you are installing both the GNOME and KDE desktops, you need to choose which desktop
you want to be the default. If you are just installing one desktop, be sure to choose it. Once
the system is installed, users can choose which desktop they want to be their default. For
more information about GNOME and KDE, refer to the Official Red Hat Linux Installation
Guide and the Official Red Hat Linux Getting Started Guide.
Next, choose whether to start the X Window System when the system is booted. This op-
tion will start the system in runlevel 5 with the graphical login screen. After the system is
installed, this can be changed by modifying the /etc/inittab configuration file.
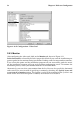
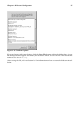
2.8.2. Video Card
Probe for video card is selected by default. Accept this default if you want the installation
program to probe for the video card during installation. Probing works for most modern
video cards. If you select this option and the installation program can not successfully probe
the video card, the installation program will stop at the video card configuration screen. To
continue the installation process, select your video card from the list and click Next.
Alternatively, you can select the video card from the list on the Video Card tab as shown
in Figure 2-10. Also select the amount of video RAM the selected video card has from the
Video Card RAM pulldown menu. These values will be used by the installation program to
configure the X Window System.