
Installation guide


Chapter 2. Kickstart Configurator 47
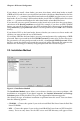
You can initialize the disk label to the default for the architecture of the system (msdos for
x86 and gpt for Itanium). Choose Yes if you are installing on a brand new hard drive.
2.4.1. Creating Partitions
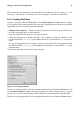
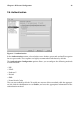
To create a partition, click the Add button. The Partition Options window shown in Figure
2-5 will appear. Choose mount point, filesystem type, and partition size for the new partition.
Optionally, you can also choose from the following:
• Additional Size Options — Choose to make the partition a fixed size, up to a chosen size,
or fill the remaining space on the hard drive.
• Force the partition to be created as a primary partition.
• Create the partition on a specific hard drive. For example, to make the partition on the
first IDE hard disk (/dev/hda), specify hda as the drive. Do not include /dev in the drive
name.
• Use an existing partition. For example, to make the partition on the first partition on the
first IDE hard disk (/dev/hda1), specify hda1 as the partition. Do not include /dev in the
partition name.
• Format the partition as the chosen filesystem type.
Figure 2-5. Creating Partitions
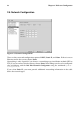
To edit an existing partition, select the partition from the list and click the Edit button. The
same Partitions Options window that appears when you add a partition appears, except it
contains the values for the selected partition. Modify the partition options and click OK.
To delete an existing partition, select the partition from the list and click the Delete button.