
Installation guide


Appendix A. Building a Custom Kernel 251
A.3.2. LILO
To configure LILO to boot the new kernel, you need to update the /etc/lilo.conf file and
run the command /sbin/lilo -v.
The default /etc/lilo.conf file looks similar to the following:
boot=/dev/hda
map=/boot/map
install=/boot/boot.b
prompt
timeout=50
message=/boot/message
linear
default=linux
image=/boot/vmlinuz-2.4.18-0.12
label=linux
initrd=initrd-2.4.18-0.12.img
read-only
root=/dev/hda5
To add your new kernel to LILO, copy the existing image section to a new one and modify
it to boot your new kernel image (and initrd image if you have any SCSI devices and have
created an initrd image). Also, rename the label of the old kernel to something such as
linux-old. Your /etc/lilo.conf should look similar to the following:
boot=/dev/hda
map=/boot/map
install=/boot/boot.b
prompt
timeout=50
message=/boot/message
linear
default=linux
image=/boot/vmlinuz-2.4.18-0.12-jul2001
label=linux
initrd=initrd-2.4.18-0.12-jul2001.img
read-only
root=/dev/hda5
image=/boot/vmlinuz-2.4.18-0.12
label=linux-old
initrd=initrd-2.4.18-0.12.img
read-only
root=/dev/hda5
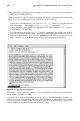
To activate your changes, run the command /sbin/lilo -v. If all goes well, you will see
output similar to the following:
LILO version 21.4-4, Copyright (C) 1992-1998 Werner Almesberger
’lba32’ extensions Copyright (C) 1999,2000 John Coffman
Reading boot sector from /dev/hda
Merging with /boot/boot.b
Mapping message file /boot/message
Boot image: /boot/vmlinuz-2.4.18-0.12
Added linux *