
Installation guide

Chapter 21. Printer Configuration 181
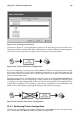
21.1. Adding a Local Printer
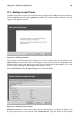
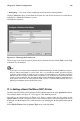
To add a local printer such as one attached to the parallel port or USB port of your computer,
click the New button in the main printconf window. The window shown in Figure 21-2 will
appear. Click Next to proceed.
Figure 21-2. Adding a Printer
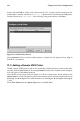
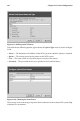
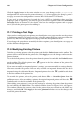
You will then see the screen shown in Figure 21-3. Enter a unique name for the printer in the
Queue Name text field. This can be any descriptive name for your printer. The printer name
cannot contain spaces and must begin with a letter a through z or A through Z. The valid
characters are a through z, A through Z, 0 through 9, -, and _.
Select Local Printer from the Queue Type menu, and click Next.
Figure 21-3. Adding a Local Printer
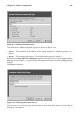
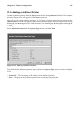
printconf attempts to detect your printer device and display it as shown in Figure 21-4.
If your printer device is not shown, click Custom Device. Type the name of your printer