
Installation guide


180 Chapter 21. Printer Configuration
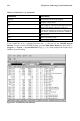
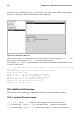
Figure 21-1. printconf
Five types of print queues can be configured with printconf:
• Local Printer — a printer attached directly to your computer through a parallel or USB
port. In the main printer list as shown in Figure 21-1, the Queue Type for a local printer is
set to LOCAL.
• Unix Printer (lpd Spool) — a printer attached to a different UNIX system that can be
accessed over a TCP/IP network (or example, a printer attached to another Red Hat Linux
system on your network). In the main printer list as shown in Figure 21-1, the Queue Type
for a remote UNIX printer is set to LPD.
• Windows Printer (SMB) — a printer attached to a different system which is sharing a
printer over a SMB network (for example, a printer attached to a Microsoft Windows ma-
chine). In the main printer list as shown in Figure 21-1, the Queue Type for a remote
Windows printer is set to SMB.
• Novell Printer (NCP Queue) — a printer attached to a different system which uses Nov-
ell’s NetWare network technology. In the main printer list as shown in Figure 21-1, the
Queue Type for a remote Novell printer is set to NCP.
• JetDirect Printer — a printer connected directly to the network instead of to a computer.
In the main printer list as shown in Figure 21-1, the Queue Type for a JetDirect printer is
set to JETDIRECT.
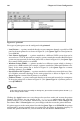
Important
If you add a new print queue or modify an existing one, you need to restart the printer daemon (lpd)
for the changes to take effect.
Clicking the Apply button saves any changes that you have made and restarts the printer
daemon. The changes are not written to the /etc/printcap configuration file until the
printer daemon (lpd) is restarted. Alternatively, you can choose File => Save Changes and
then choose File => Restart lpd to save your changes and then restart the printer daemon.
If a printer appears in the main printer list with the Queue Type set to INVALID, the printer
configuration is missing options that are required for the printer to function properly. To
remove this printer from the list, select it from the list and click the Delete button.