
Installation guide


152 Chapter 15. BIND Configuration
/etc/named.conf configuration file, write all the individual zone files in the /var/named
directory, and have the daemon reload the configuration files.
15.2. Adding a Reverse Master Zone
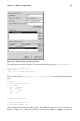
To add a reverse master zone, click the Add button and select Reverse Master Zone. Enter
the first three octets of the IP address range that you want to configure. For example, if you
are configuring the IP address range 192.168.10.0/255.255.255.0, enter 192.168.10 in the IP
Address (first 3 Octets) text area.
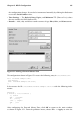
A new window will appear, as shown in Figure 15-3, with the following options:
1. IP Address — The first three octets that you just entered in the previous window.
2. Reverse IP Address — Non-editable. Pre-populated based on the IP Address entered.
3. File Name — File name of DNS database file in the /var/named directory.
4. Primary Name Server (SOA) — State of authority (SOA) record. This specifies the
name server that is the best resource of information for this domain. The default value
is @, which means that the SOA is the same as the domain name entered in the Name
field above.
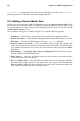
5. Time Settings — The Refresh, Retry, Expire, and Minimum TTL (Time to Live) values
that are stored in the DNS database file.
6. Name Servers — Add, edit, and delete name servers for for the reverse master zone.
At least one name server is required.
7. Reverse Address Table — List of IP addresses within the reverse master zone and their
hostnames. For example, for the reverse master zone 1.2.3, you can add 1.2.3.100 in the
Reverse Address Table with the hostname foo.example.com. The hostname must end
with a period (.) to specify that it is a full hostname.